


Looking for Help?
Find answers to your questions
FAQ for Adventurer 5M Pro
Table of Contents
- Q1. How to unclog the nozzle?
- Q2. How to replace the nozzle?
- Q3. Is leveling required after nozzle replacement?
- Q4. What to do if the extruder moves but doesn't extrude filament at the beginning of printing after clicking the model for printing?
- Q5. What to do if the nozzle position is too high (far from the platform) or too low (hitting the platform) during printing? How to level it?
- Q6. Can filaments from other brands be used?
- Q7. Is it safe to print with ABS material?
- Q8. What to do if the printed model warps or doesn't adhere well?
- Q9. What to do if print files cannot be found and the screen displays only folders after inserting the USB flash drive?
- Q10. What to do with the Wi-Fi connection failure?
- Q11. Firmware update precaution.
- Q12. Why is the boot screen white?
- Q13. Over-extrusion on the first layer after replacing the textured PEI flexible platform of Adventurer 5M series with the smooth PEI flexible platform
- Q14. What is the Z offset? How to adjust the Z offset?
- Q15. How to replace the Protector with Optimized on Adventurer 5M Series
- Q16.How to Find Your Adventurer 5M Pro's Serial Number
- Q17.How to Copy Logs on Adventurer 5M Pro
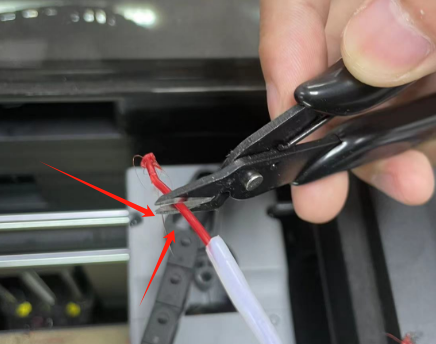
Q1. How to unclog the nozzle?
Method 1: a) Click [Load] and heat the nozzle to the printing temperature of the used filament.
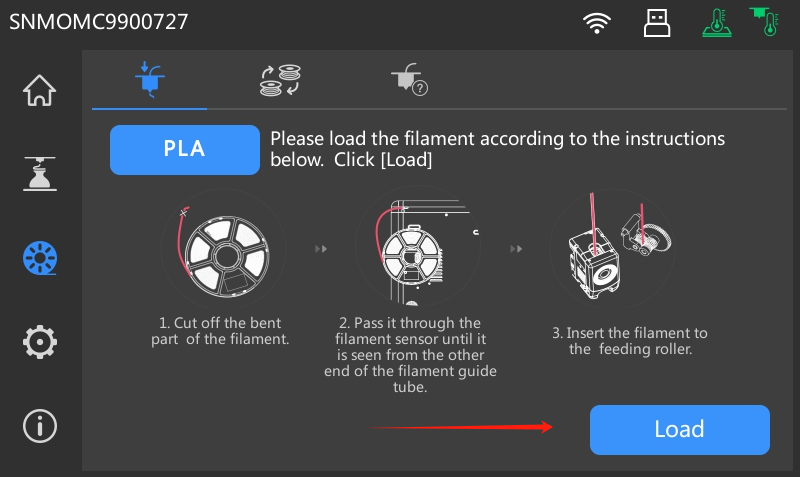
b) After heating, remove the filament guide tube, and check if the filament is bent or filament tip is not smooth.
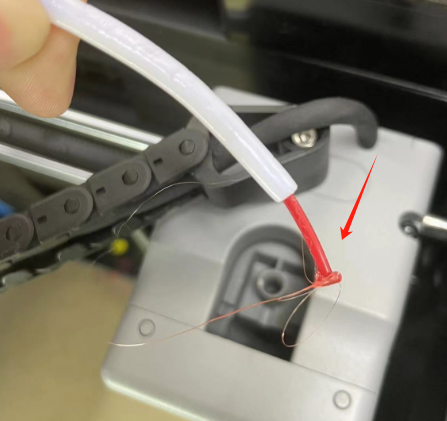
c) If so, trim and insert the guide tube and filament into the nozzle, then click [Load] and check.
Method 2: If Method 1 doesn't work, use the unclogging pin tool.
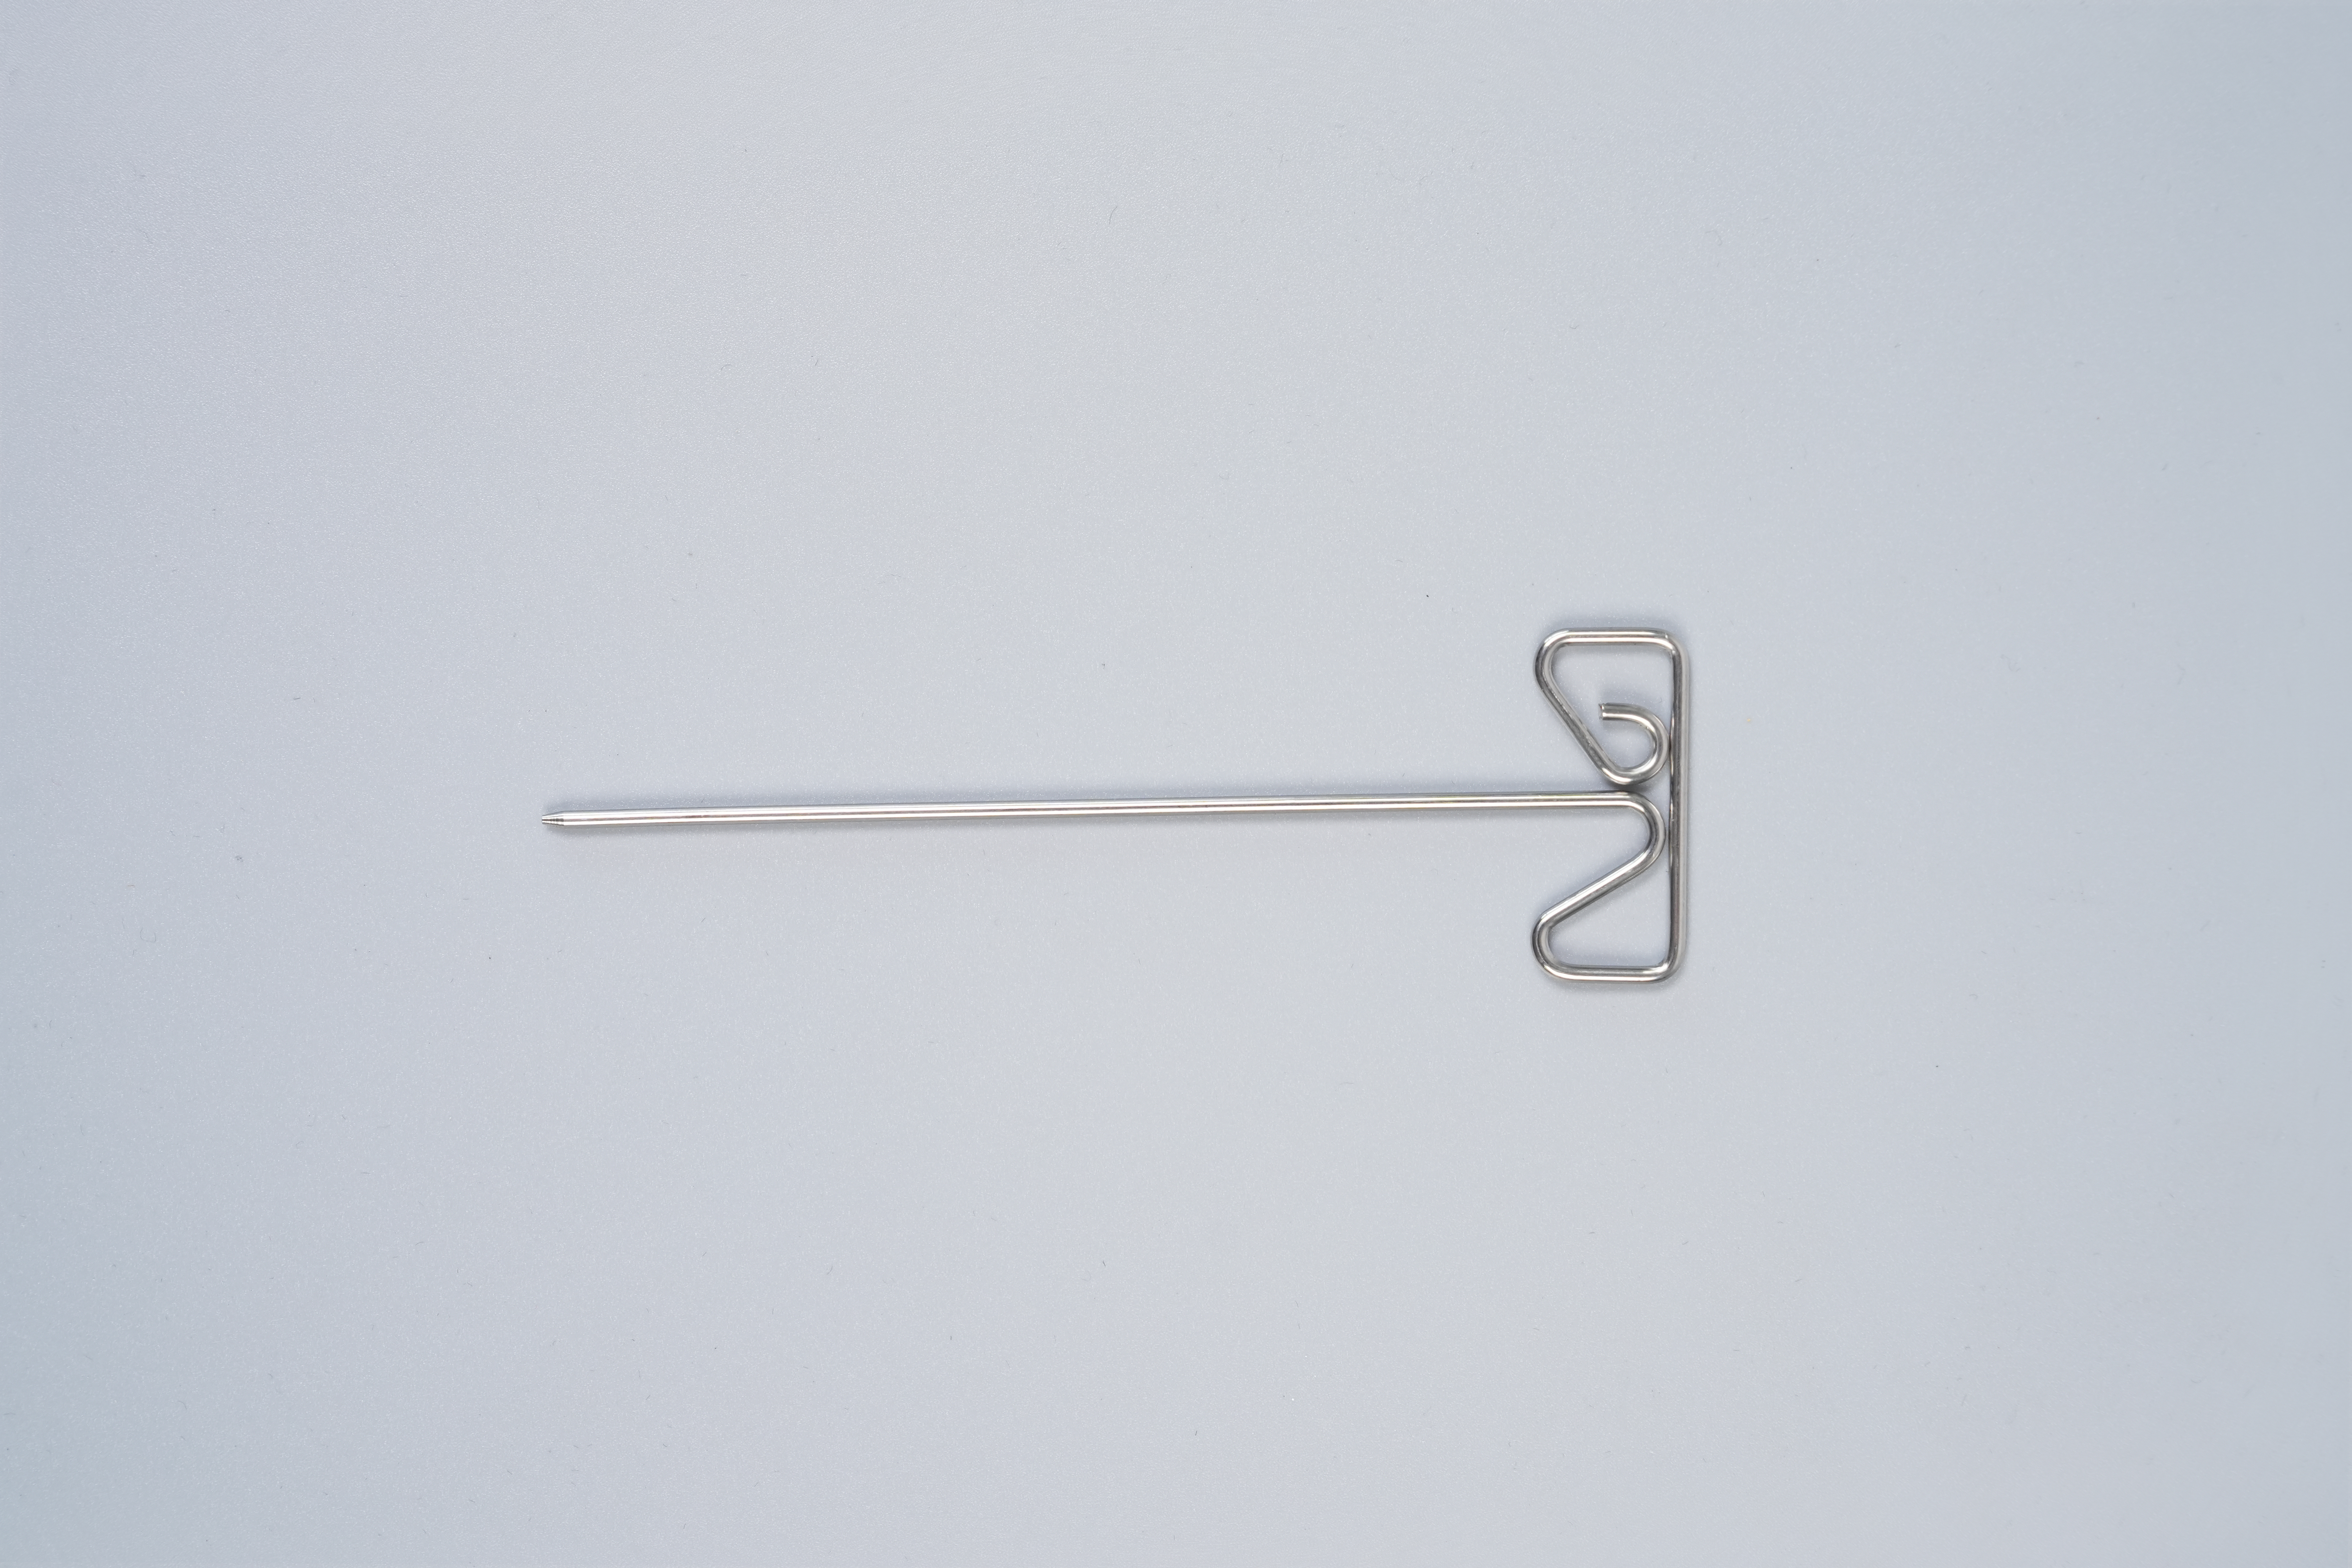
Method 3: If Method 2 doesn't work, please replace the nozzle.
For details, please refer to the maintenance video
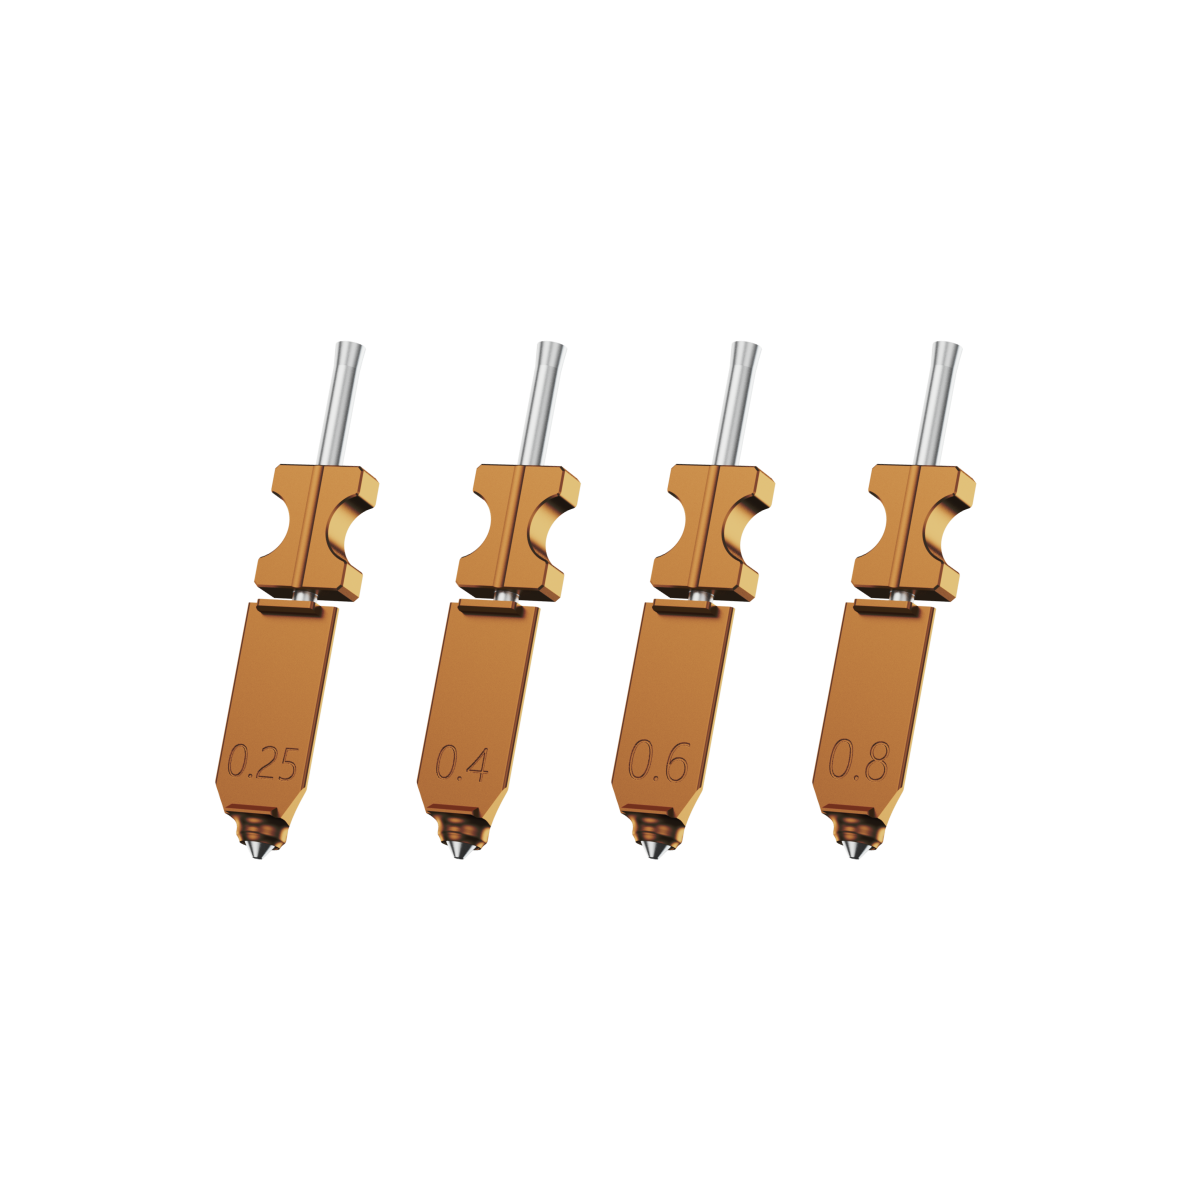
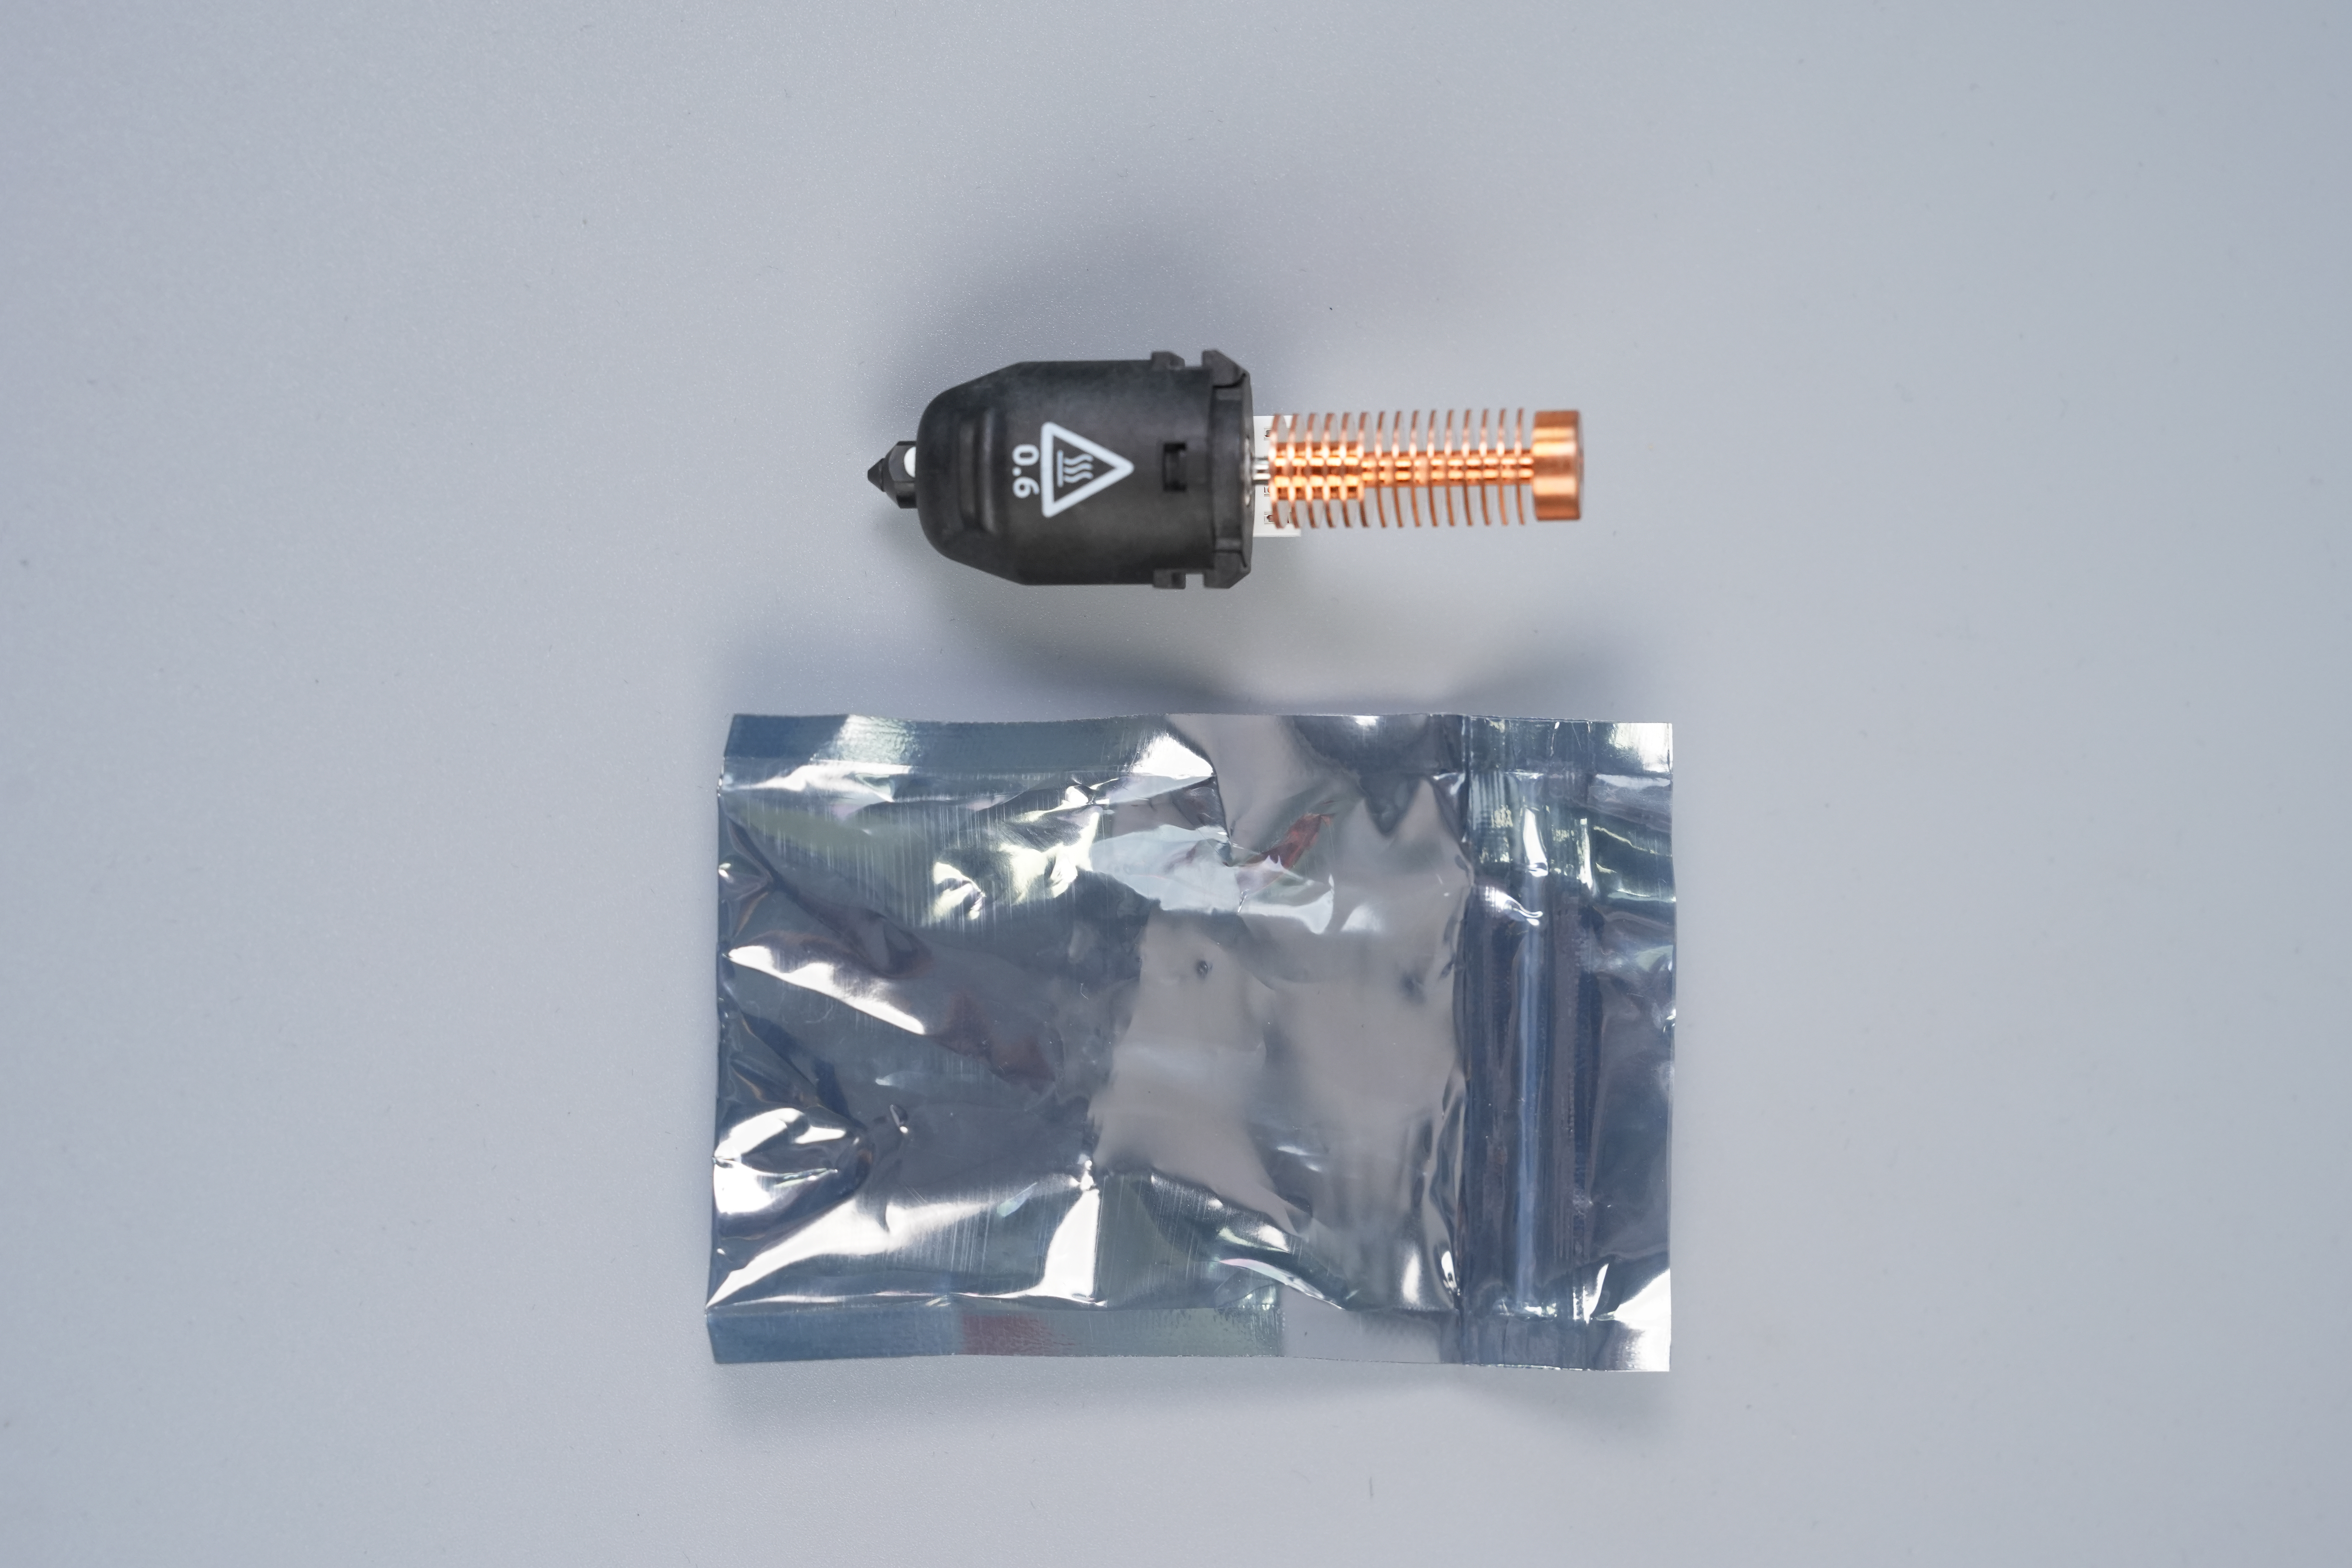
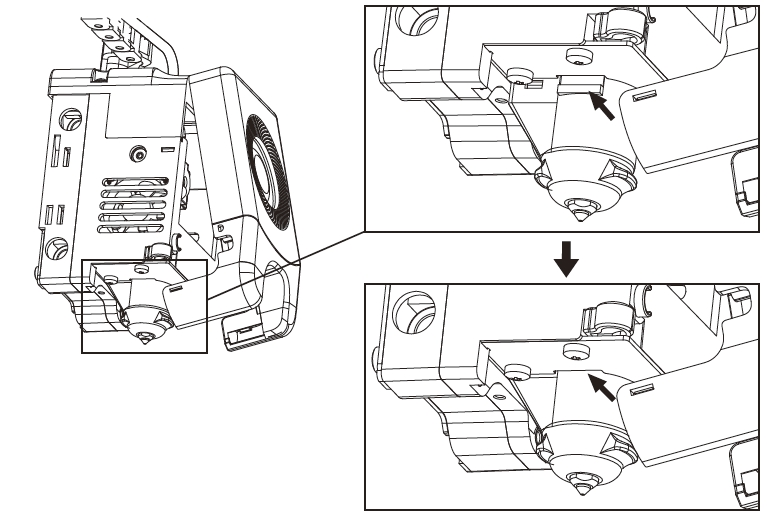
Q2. How to replace the nozzle?

Please power off the printer before replacing the nozzle!
Remove the filament guide tube and cut the filament.

Press the left and right buckles and remove the nozzle. Trim the filament along the nozzle top.

Insert the new nozzle into the extruder and you can hear a "click" sound indicating the buckle position has changed. Ensure that the nozzle slot aligns flush with the bottom of the extruder. Note: If you have trouble aligning the nozzle, you can press the buckles during installation or remove the front cover of the extruder(grab the lower part of the front cover with your hand and lift it upward slightly)to check the position.
Whether it is installed in place is judged as follows:
1. Ensure the nozzle is pressed to the bottom firmly during installation.
2. Check if it is properly installed:
a. Check the red buckle positions on the left and right.
b. Check if the nozzle slot is flush with the bottom of the extruder (if your view is obstructed, you can remove the front cover of the extruder to observe).
4. Power up the printer, click [ ] to enter the loading interface, and follow the on-screen instructions to complete filament loading (refer to 4.1.1). Filament coming out of the new nozzle smoothly indicates a successful nozzle replacement.
Q3. Is leveling required after nozzle replacement?
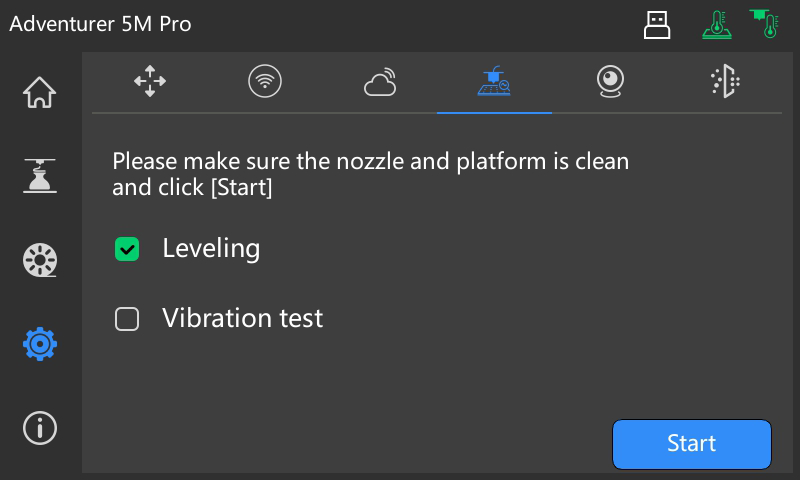
Yes. It is recommended to perform automatic leveling to ensure high print quality as slight errors may occur during nozzle installation. The equipment defaults to the leveling operation before each print.
Also, it's required to perfom all three calibrations after a nozzle replacement:
- Leveling: perform 25 points grid leveling.
- Vibration test: perform input shaping to calibrate the vibration compensation performance.
- PID calibrate: perform the PID setting for nozzle heating performance so that the heating is more accurate.
Note: The PID calibrate is the exact thing for temp cali of 5M Pro.
Q4. What to do if the extruder moves but doesn't extrude filament at the beginning of printing after clicking the model for printing?
- Observe the filament guide tube to check if filament has entered the nozzle. If not, please click [Load] until filament comes out.
- Check if the nozzle is clogged. If so, please refer to the solution of Q1.
Q5. What to do if the nozzle position is too high (far from the platform) or too low (hitting the platform) during printing? How to level it?
Please check if the platform is properly installed and there is no excessive residue on the nozzle. If these issues exist, address them first. Then, go to the settings interface, select the leveling option, and perform automatic leveling or enable automatic leveling before printing.
Q6. Can filaments from other brands be used?
Yes. You can use filaments from other brands (limited to 1.75mm diameter filaments), but certain parameter adjustments are required due to slight temperature differences in different filaments.
Q7. Is it safe to print with ABS material?
ABS can release toxic gases during heating. If conditions permit, consider printing in a wellventilated area. It is recommended to print non-toxic materials such as PLA in children's activity places.
Q8. What to do if the printed model warps or doesn't adhere well?
Method 1: Increasing the platform temperature can improve the adhesion between the platform and the model.
Method 2: Adding a brim during model slicing can alleviate the issue.
Method 3: Apply glue.
Method 4: Clean the platform to remove any oil or dirt.
Method 5: Check if the platform is level. The leveling and calibration function can be used.
Q9. What to do if print files cannot be found and the screen displays only folders after inserting the USB flash drive?
The USB flash drive format is incorrect. The printer supports the FAT32 file system. Please format the USB flash drive to FAT32.
Q10. What to do with the Wi-Fi connection failure?
1. Please check if the Wi-Fi name contains special characters. If so, modify it and try again.
2. Please check if the password contains special characters. If so, modify it and try again.
Q11. Firmware update precaution.
Do not power off the printer or disconnect from the network during firmware download or update to prevent update failures.
Q12. Why is the boot screen white?
If the startup sound can be heard, please replace the screen or cable. If not, please contact our after-sales personnel.
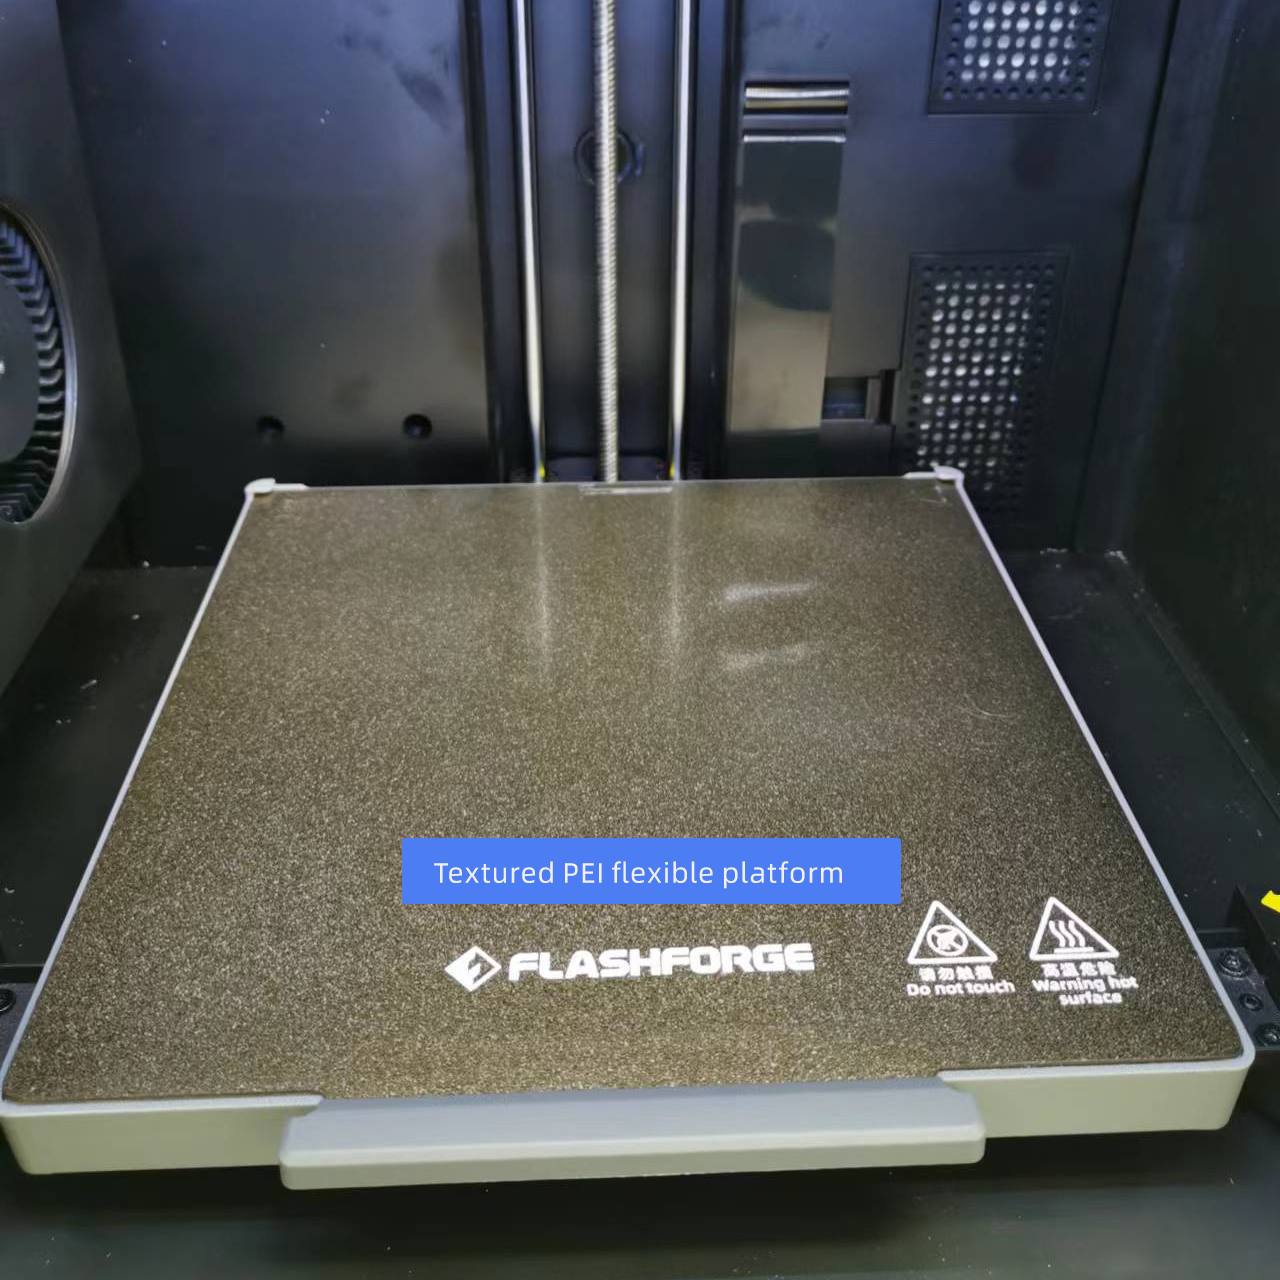
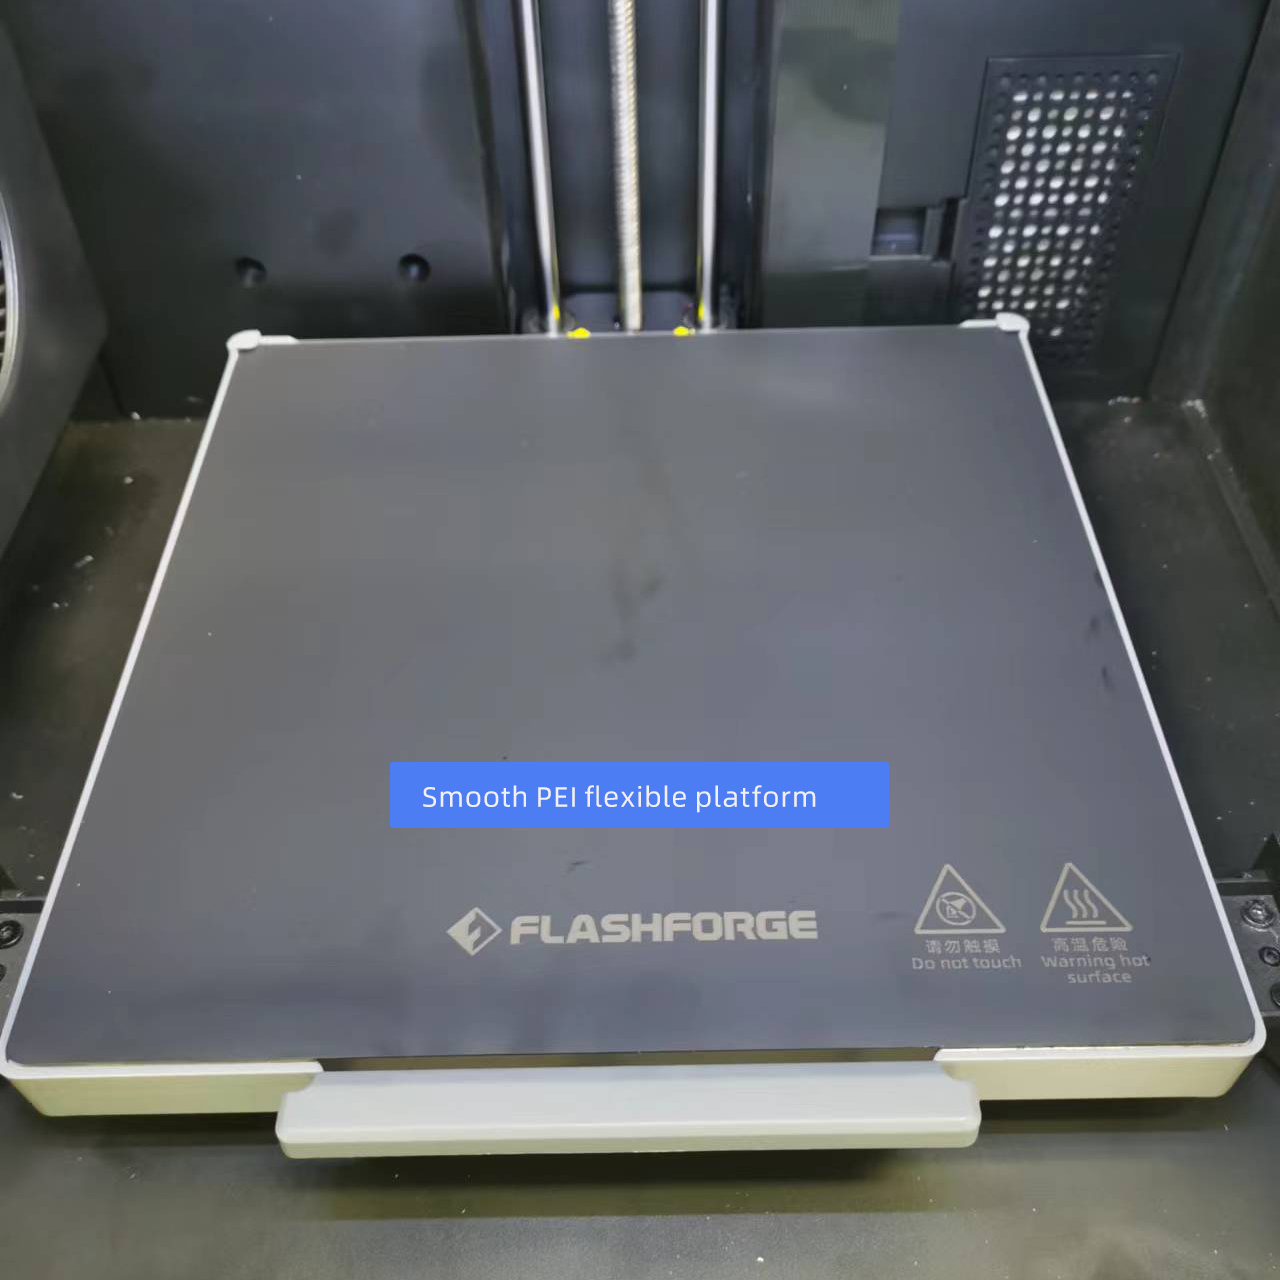
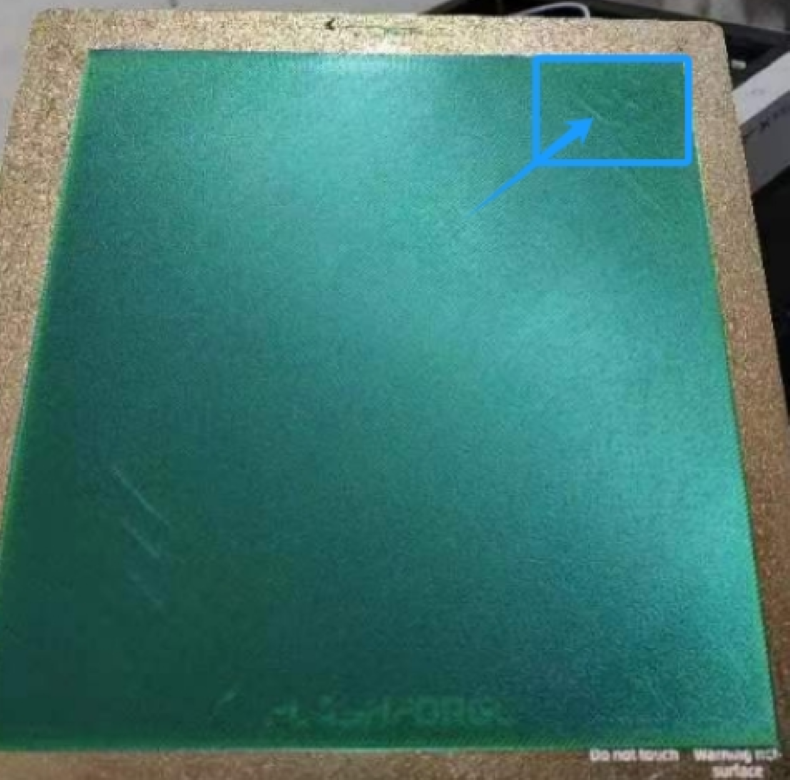
Q13. Over-extrusion on the first layer after replacing the textured PEI flexible platform of Adventurer 5M series with the smooth PEI flexible platform
Issue: After changing the platform and performing automatic leveling, the first layer is getting over-extruded, as shown below.

Reason: With all the settings unchanged, the textured PEI flexible platform has lots of bumps and hollows; this increases the surface contact of the filament with the plate. However, the smooth surface of the smooth PEI flexible platform causes too much filament to be squeezed out by the extruder, leading to over-extrusion.
Solution:
After switching to the smooth PEI flexible platform, perform automatic leveling in the system settings.
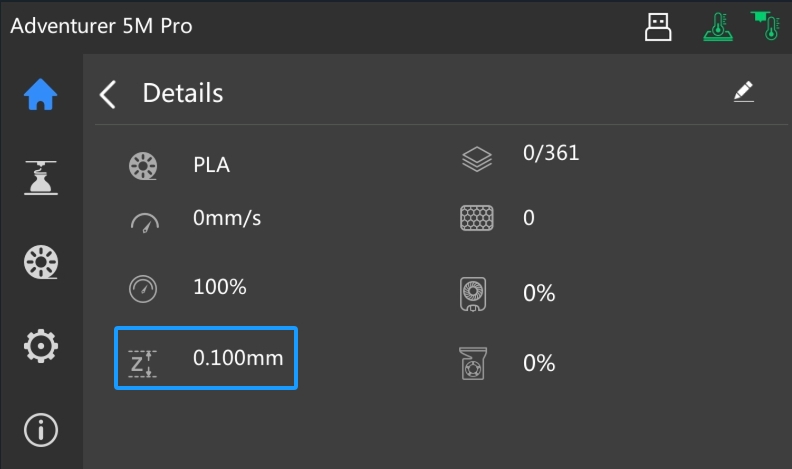
Upon completing automatic leveling, adjust the Z offset to 0.1mm before starting the print. Save the adjustment, and then the printing should proceed normally.
Refer to Q14 for Z offset adjustment.
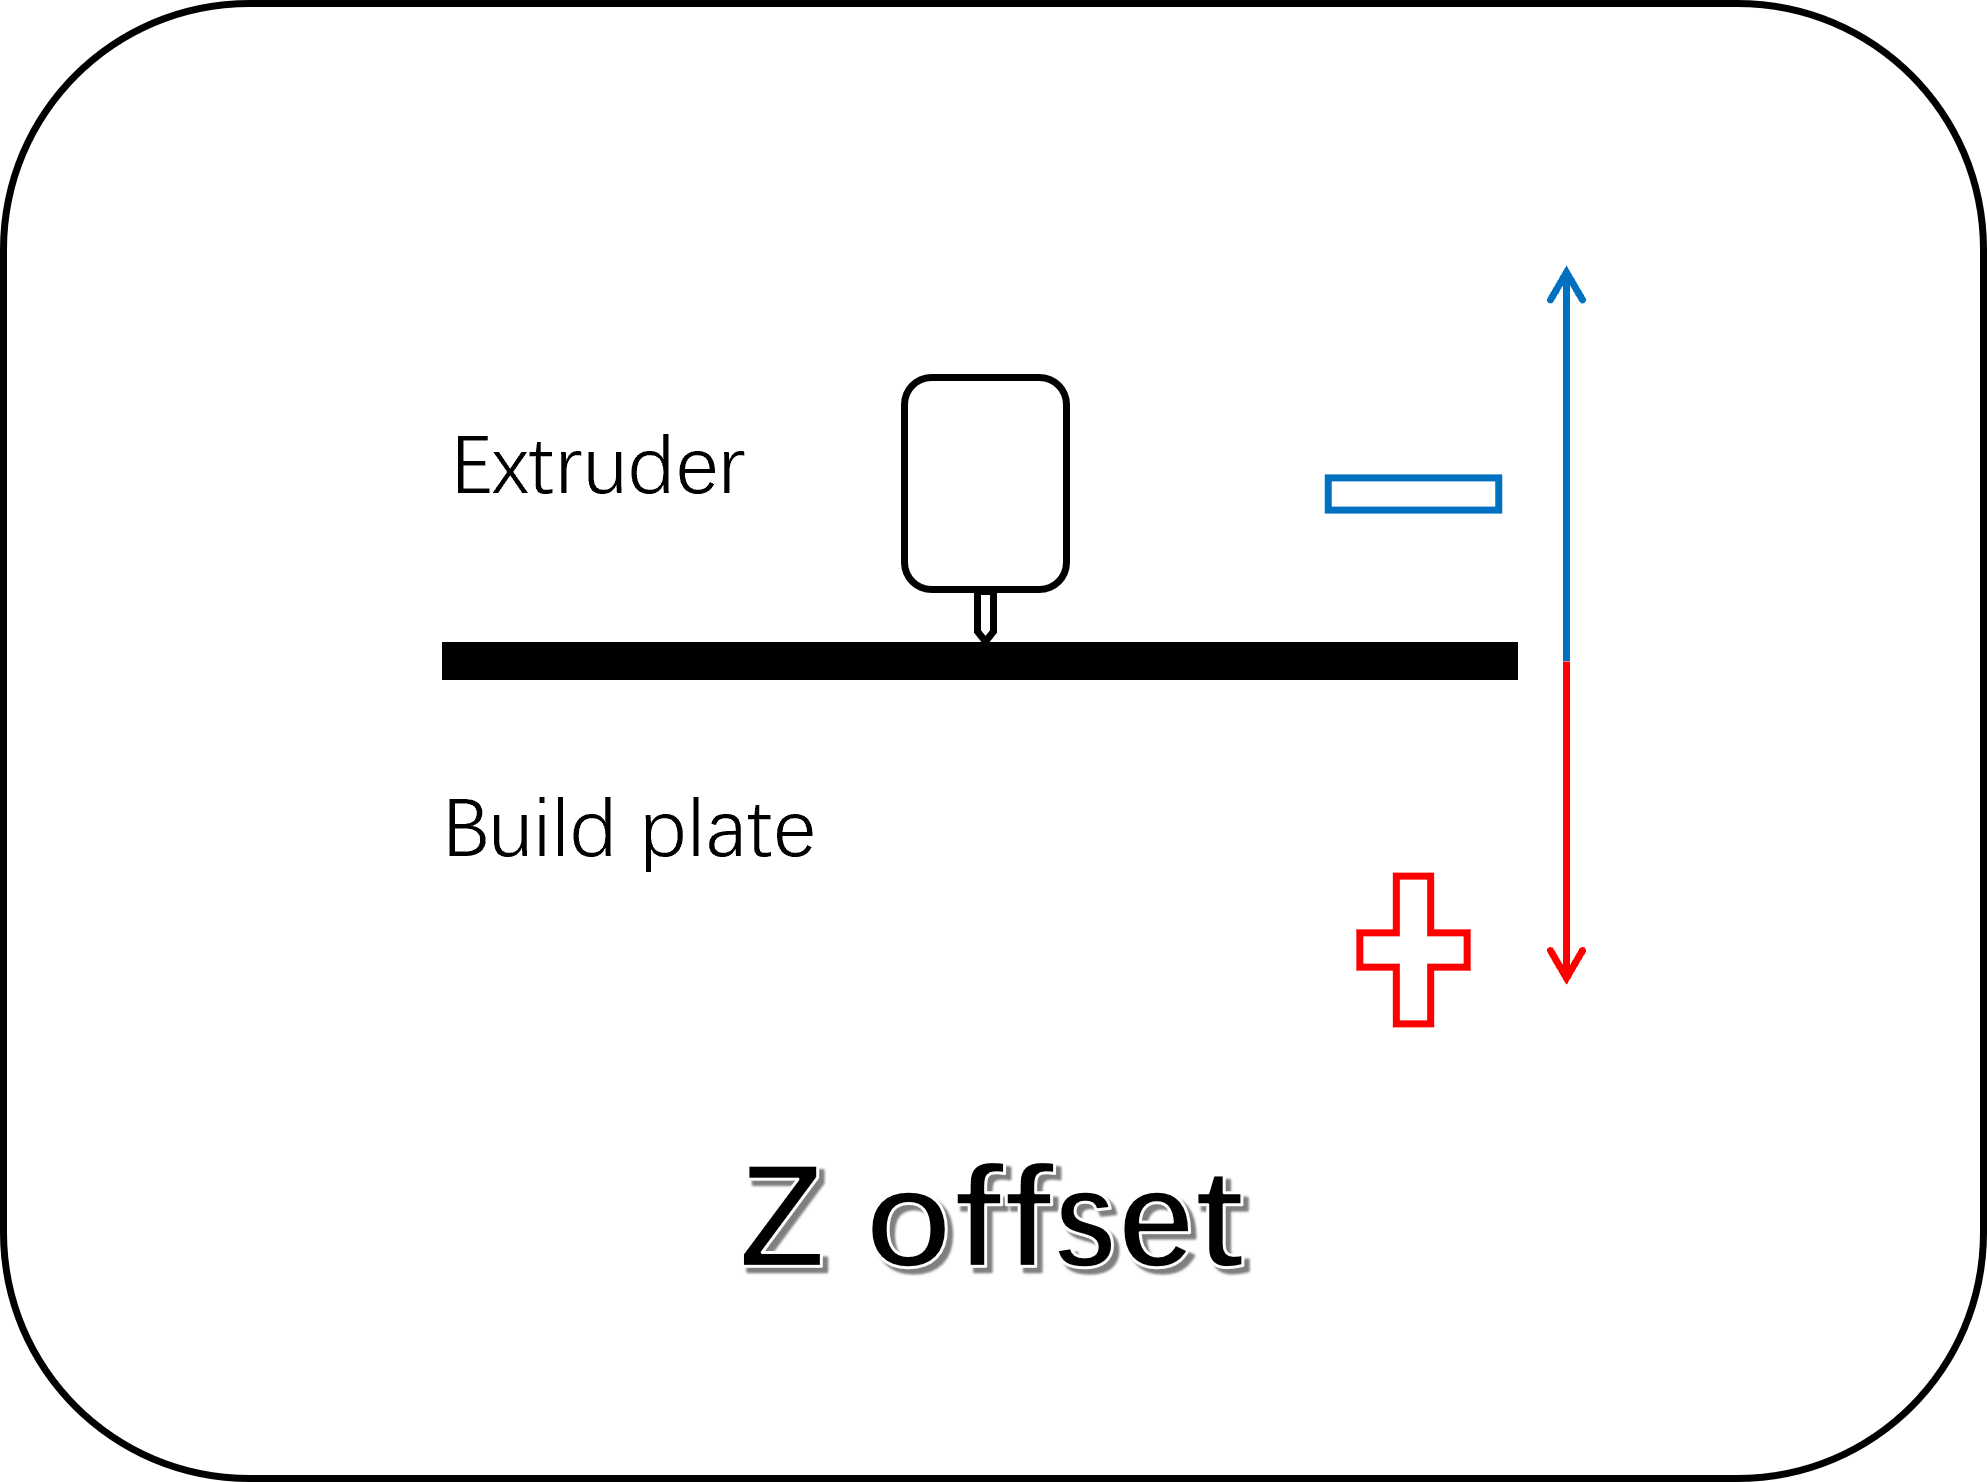
Q14. What is the Z offset? How to adjust the Z offset?
Z offset is the adjusted distance from the nozzle height, the sign of the value says that the direction is following normal printing direction or back to the printhead.
A positive Z offset value will lower the platform (goes away from the printhead), and a negative z offset value will rise the platform (approaching the printhead).
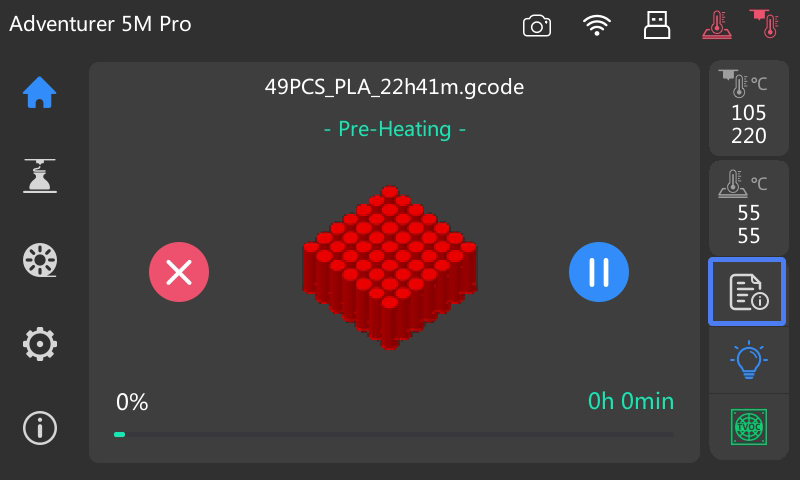
After completing printer preparation, select the icon in the blue box on the preheating interface as shown below.
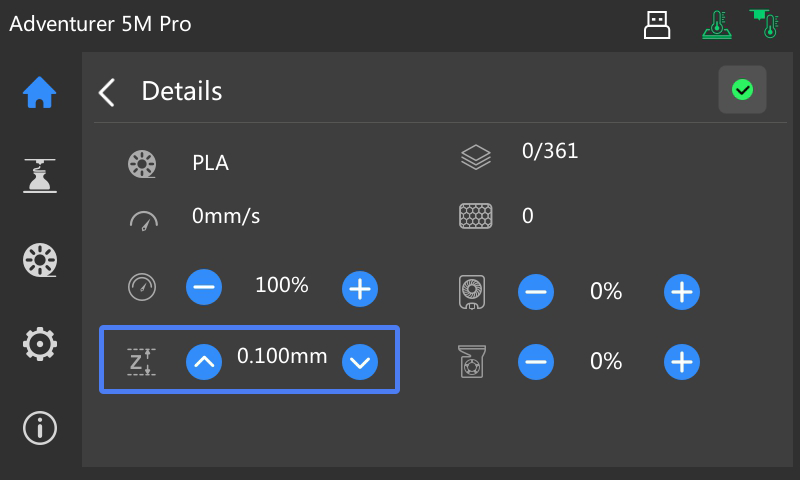
Then, click [ ] in the upper right corner to enter the modification interface.
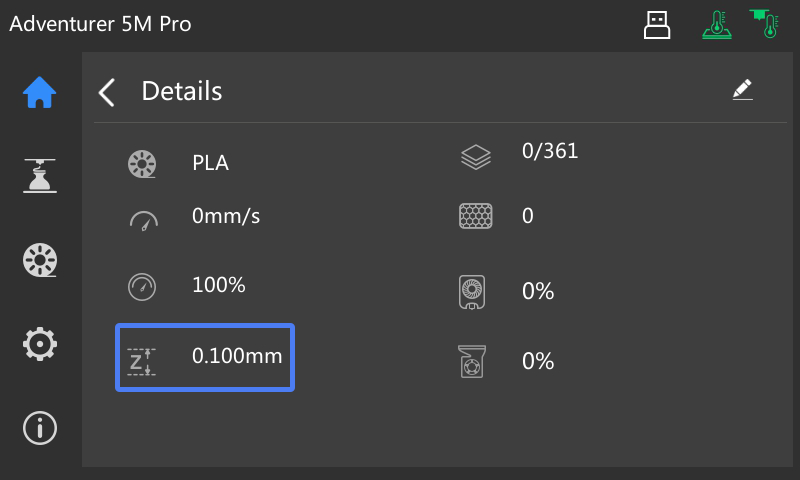
After making the necessary changes, click [ ] to complete the modification. Then it will display as shown below.
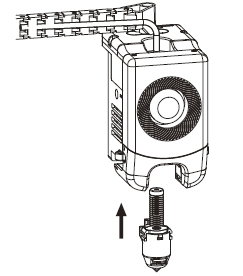
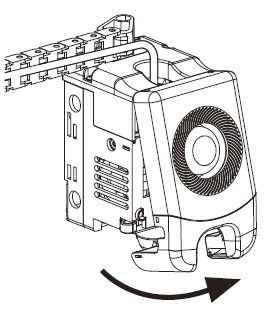
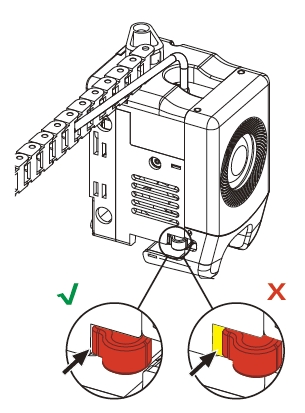
Q15. How to replace the Protector with Optimized on Adventurer 5M Series
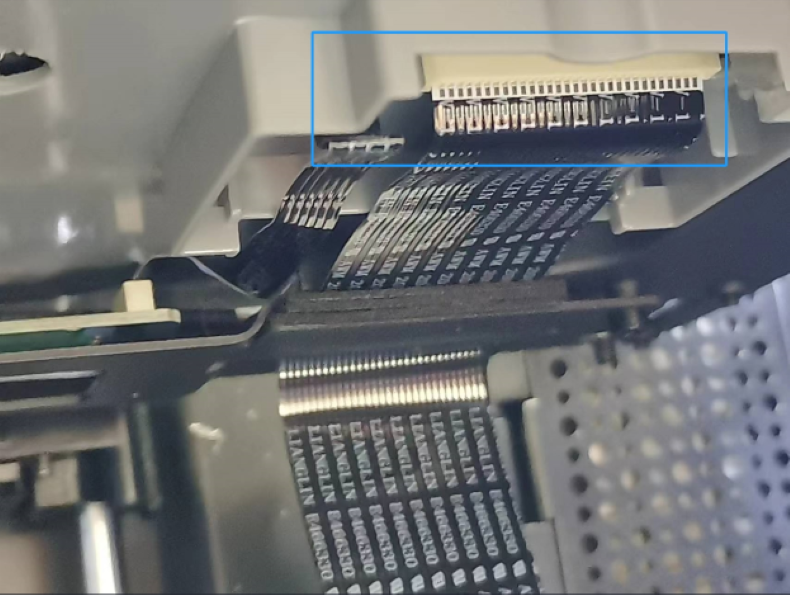
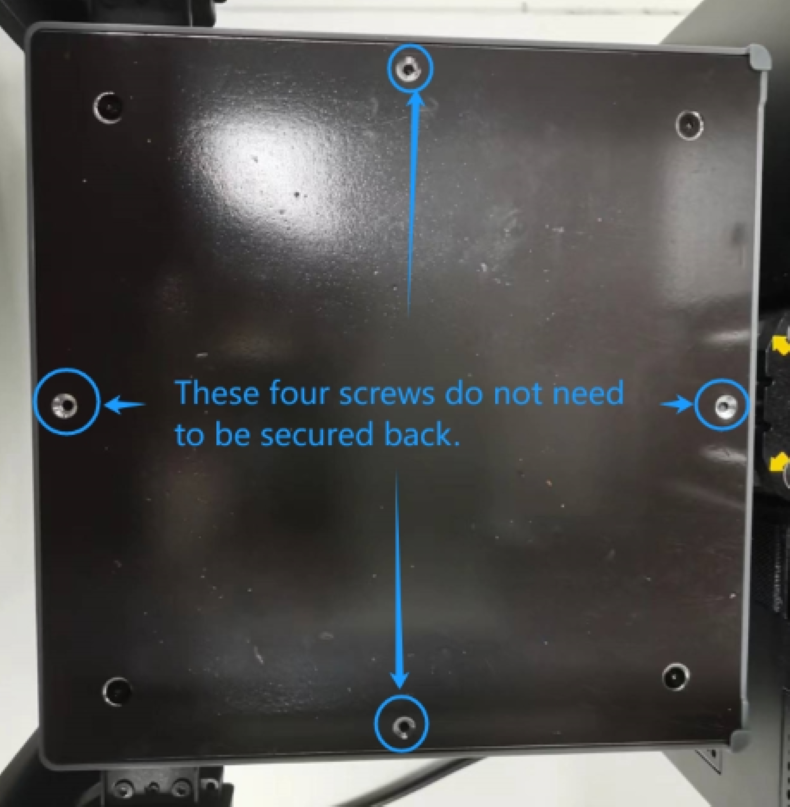
Step 1: Raise the platform to a height suitable for operating and power off. Remove the black pressing plate and unplug the two cables at the bottom of the platform as shown in the figure.
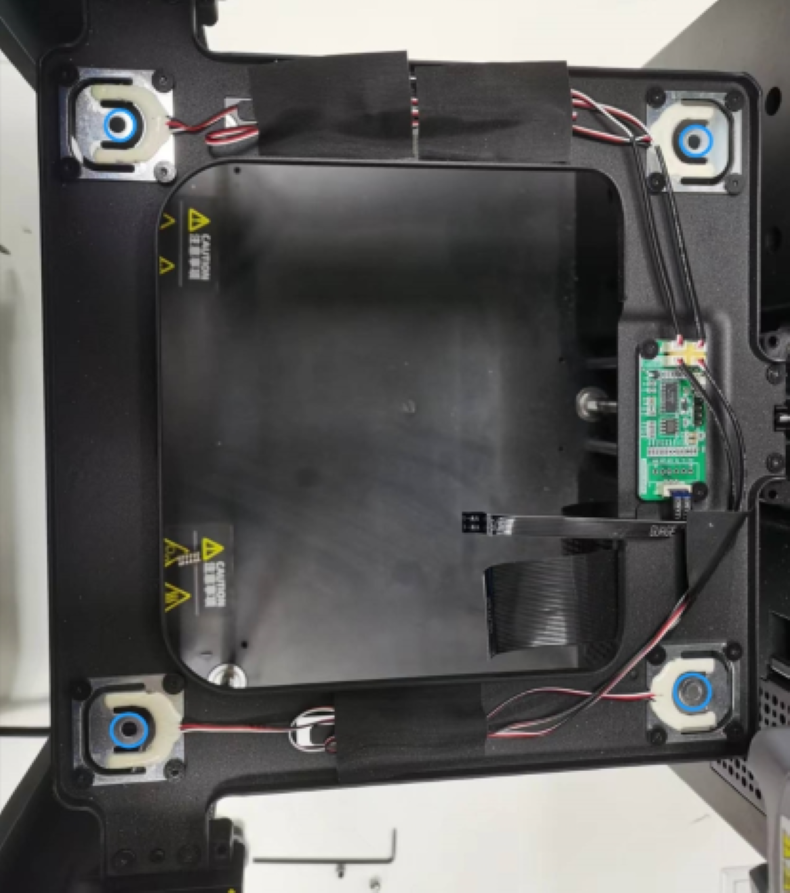
Step 2: Remove the flexible platform. Unscrew the four nuts underneath the platform.
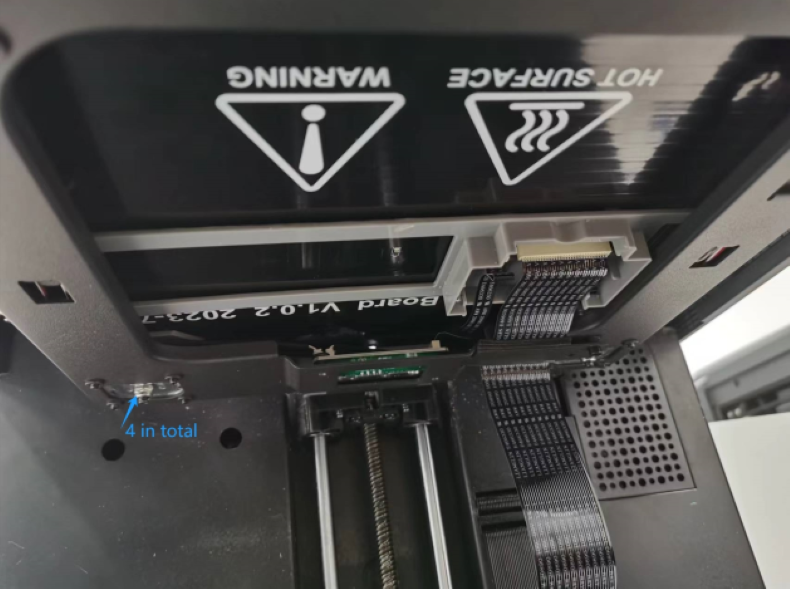
Step 3: Remove the heating plate and plastic protector together, and then collect the loosened screws,spring and nuts.

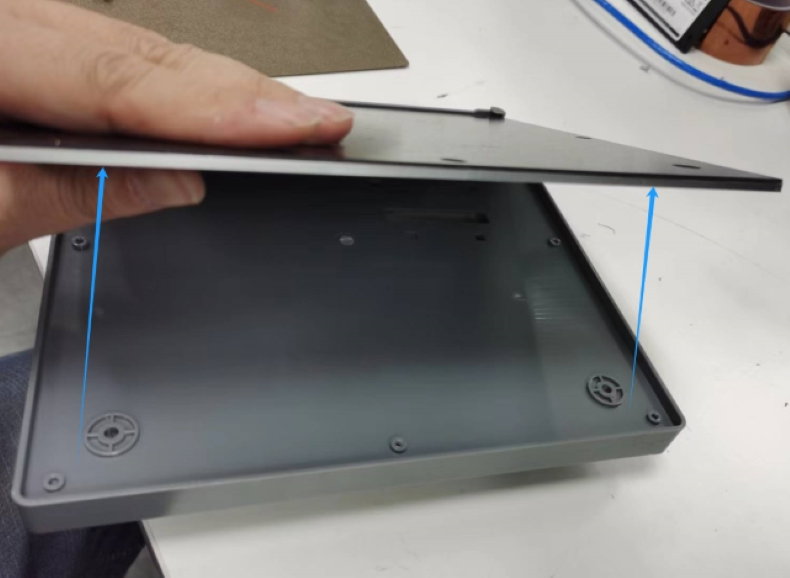
Step 4: Remove the four screws securing the heating plate, and then remove the heating plate from the plastic protector.

Step 5: Fit the aluminum heating plate into the optimized protector and clamp the spring at the installation position.
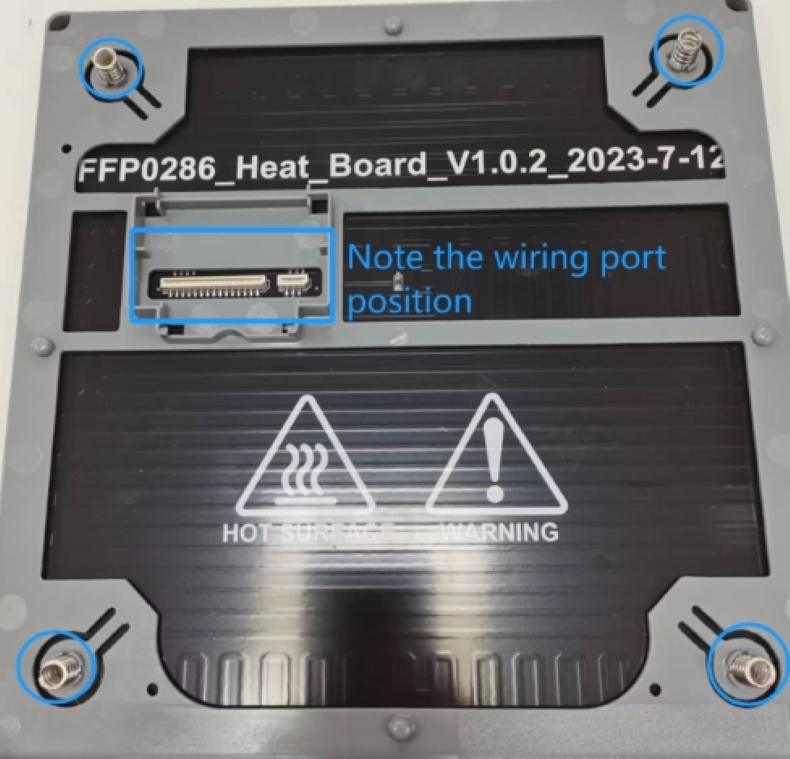
Step 6: Place the assembled heating plate and protector onto the platform plate, ensuring the screws pass through the electronic scale holes.
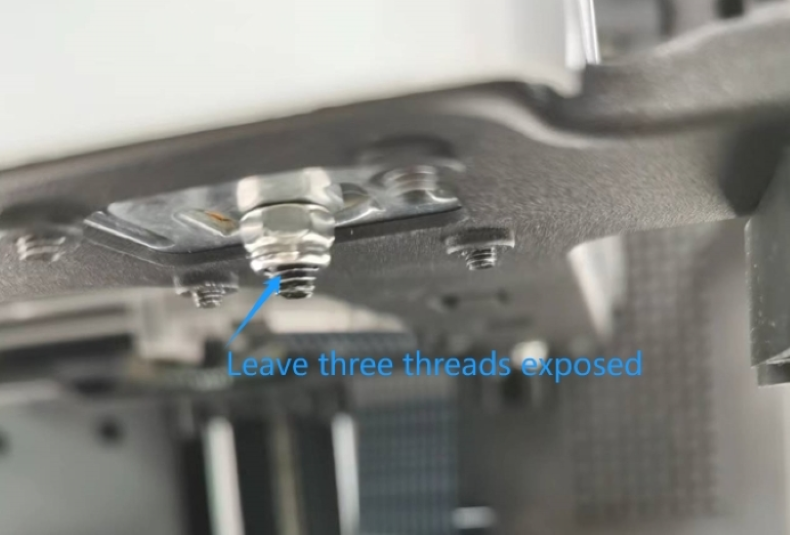
Step 7: After securing the four screws, shake it gently in all directions to ensure the springs are vertical on each electronic scale and the heating plate is leveled. Then tighten the nuts. All four nuts should expose three threads, as shown below.
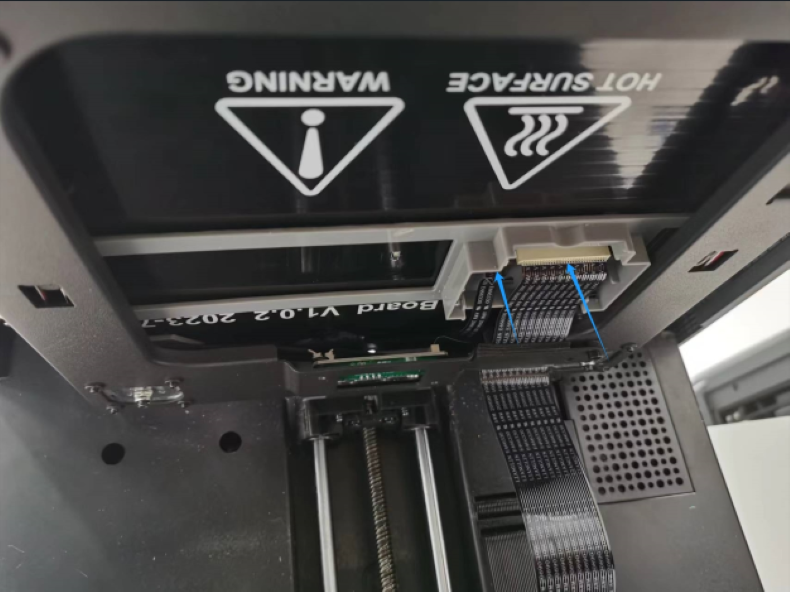
Step 8: Plug in the large and small cables and install the protective cover.
Step 9: Power on and perform leveling.

Step 10: After leveling, it's recommended to print a full-size layer of 0.2mm thickness to confirm the flatness of the first layer. For example, if the top right corner is slightly loose, adjust the nut clockwise by half a turn.
Note: During the preheating stage before printing, please ensure the Z offset is zero. If not, it's advised to adjust it to zero first.
Step 11: After achieving satisfactory printing results through fine-tuning, you can proceed to print your own models.

Note: If the entire surface is too loose or too tight during printing, you can perform compensation by adjusting the Z offset.
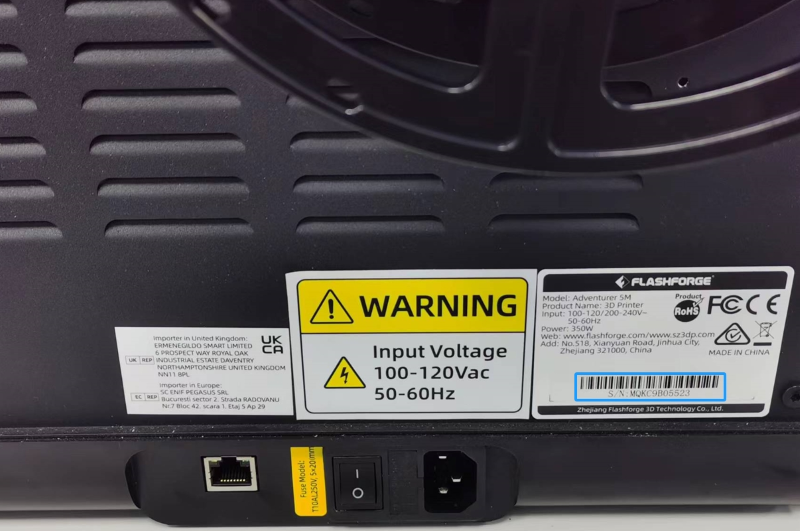
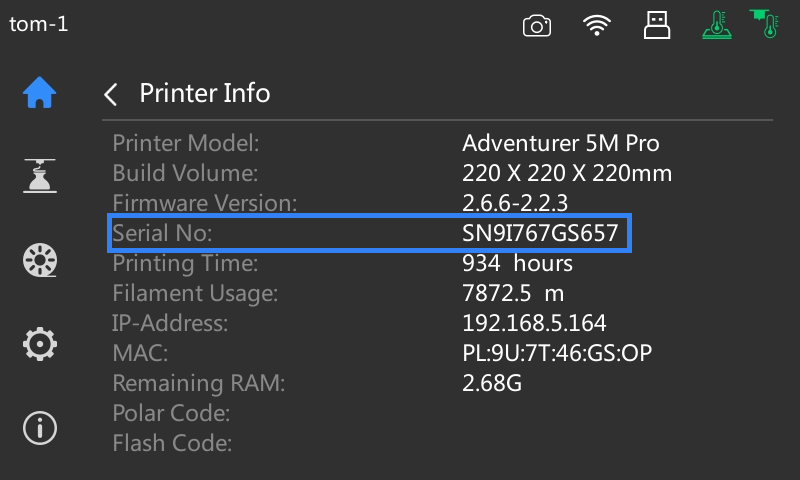
Q16.How to Find Your Adventurer 5M Pro's Serial Number
There are two ways to find the serial number:
Method 1: Check the label
When our customer support team request the serial number, you can take a photo of the label on the back of your printer and send it to them. The serial number is located in the blue box below.
Method 2: Check on the printer info interface
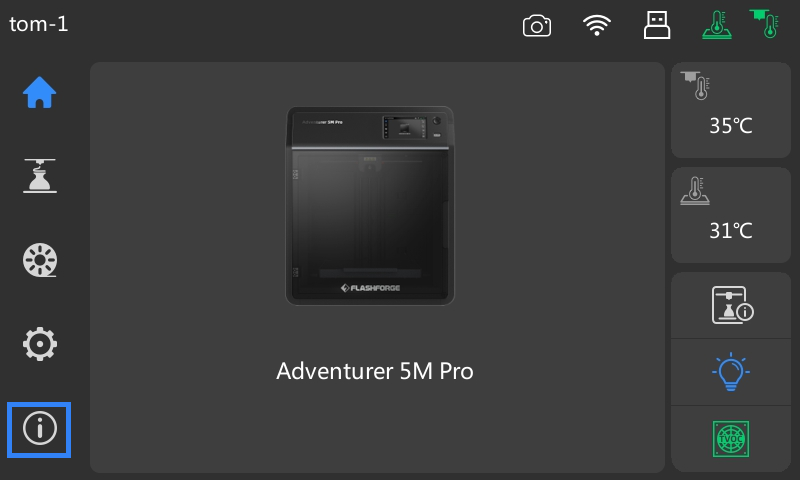
1. On the main interface, click [ ].
].
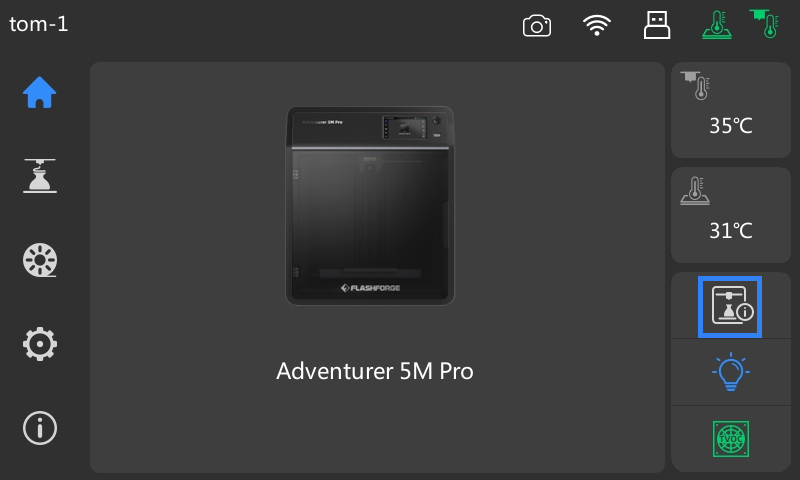
2. The serial number is displayed on the printer info interface, as shown in the blue box below.
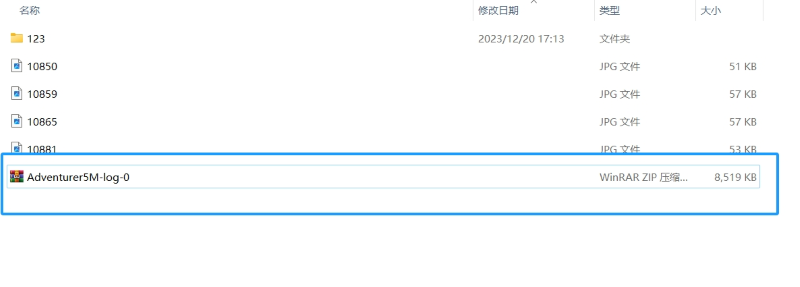
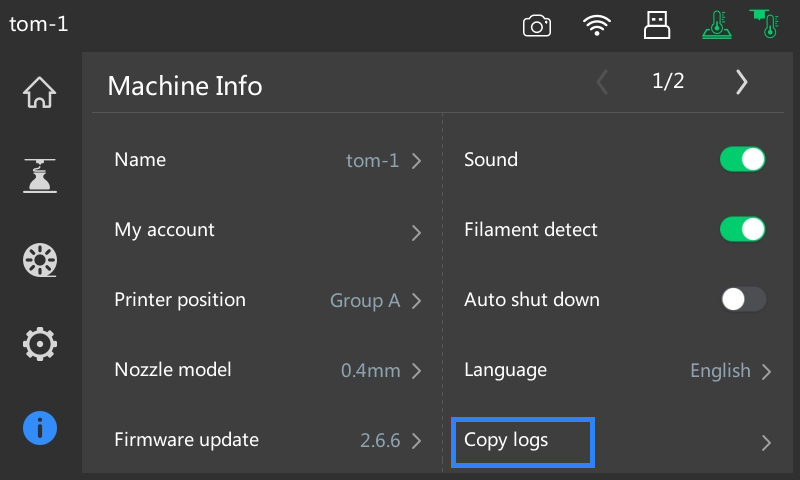
Q17.How to Copy Logs on Adventurer 5M Pro
In case of systemic issues, identifying the root cause solely based on observable symptoms may prove challenging. Therefore, device logs may be required for further analysis. Follow these steps to copy the logs:
Step 1: On the main interface, click [ ] to enter the machine info interface.
Step 2: Then, you'll find [Copy logs] on the machine info interface.
Step 3: Insert a USB flash drive into the printer.

Step 4: Click [Copy logs], and it will start copying the logs to the USB flash drive, as shown below. (*Do not remove the USB flash drive during this process, or the copy will fail.)
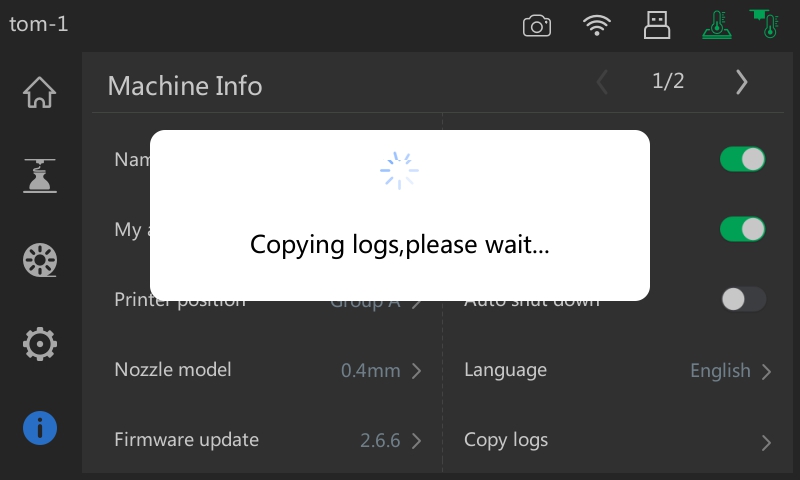
Step 5: Once the copying is completed, a notification will pop up. You can then safely remove the USB flash drive from the printer.
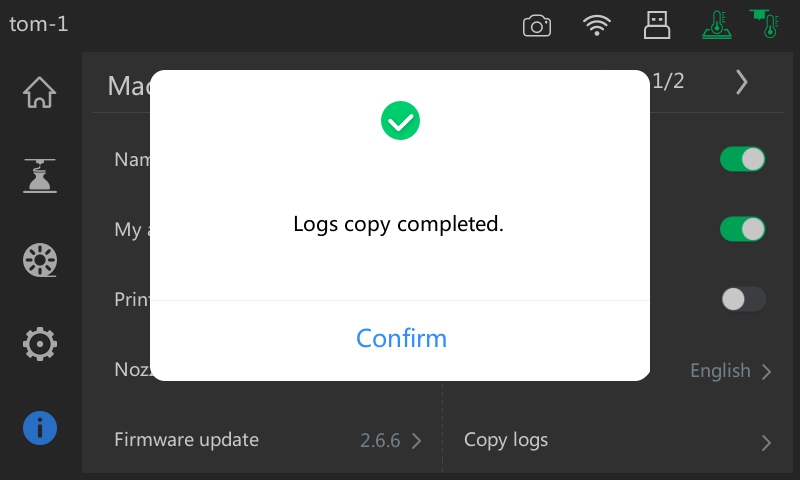
Step 6: Export the logs from the USB flash drive and send them to our customer support team for further assistance.