Looking for Help?
Find answers to your questions
-
Adventurer 5M Series
- FAQ for Adventurer 5M Pro
- FAQ for Adventurer 5M
- Unboxing Your Adventurer 5M Pro
- Adventurer 5M Series Firmware Update Log
- Firmware Upgrade
- Troubleshooting: Network-related Issues
- Troubleshooting: Equipment Error Messages
- AD5M Series Troubleshooting: Equipment Hardware Issues
- AD5M Series Troubleshooting: Print Quality Problems
- Troubleshooting: Equipment Usage Issues
- Basic Setup
- Accessories List
- Unboxing Your Adventurer 5M
- Introduction to Adventurer 5M Series
- FAQ for Guider 3 Ultra
- Perform a firmware update on Guider 3 Ultra
- Firmware release note
- Troubleshooting for Guider 3 Ultra
- Basic setup
- Accessories list
- Unboxing your Guider 3 Ultra
- Introduction to Guider 3 Ultra
- AD5X Firmware Upgrade
- Print Without IFS
- Print via Orca-Flashforge
- Print Models from a USB Flash Drive on AD5X
- Print Built-in Models on AD5X
- Change Filament on AD5X
- Loading Filament
- AD5X Printing on the Build Plate
- AD5X Preparation before Printing
- Refill Printing
- Automatic filament loading
- Multi-Color Printing
- Connecting IFS to AD5X
- AD5X Basic Setup
- Accessories List for AD5X
- Quick-start Guide for Your AD5X
- Unboxing Your AD5X
- Introduction to AD5X
- Print Built-in Models on Adventurer 5M Series
- Preparation before Printing
- Printing on the Build Plate
- Creative Designs from our Users
- Test print models for HS PLA (print with ad5m series)
- From 0 to 250: The Rise of a 3D Print Farm
- How to Series Video on Youtube
- AD5M Series Slicing Profile
- Maker Series Video on Youtube
- Page Contents
- Printer Mod and DIY
Table of Contents
- 1. Bed Hitting the Extruder During Auto-leveling.
- 2. After Auto-leveling the Extruder Is Too Far Away from the Bed when Printing the First Layer.
- 3. When Preheating the Extruder It Doesn't Heat up or the Temperature Displays as a Negative Value.
- 4. Insensitive Touchscreen: No Response When Clicking Menu Options.
- 5. Bed Not Heating During Preheating.
- 6. Magnetic Bed Sticker Unstuck and Warped.
- 7. Printer Stops / Extruder stops Mid-print/ Screen Unresponsive.
- 8. Sizzling Noise During Bed Preheating.
- 9. Both the Nozzle Temperature and Bed Temperature Displays as 0.
AD5M Series Troubleshooting: Equipment Hardware Issues
Table of Contents
- 1. Bed Hitting the Extruder During Auto-leveling.
- 2. After Auto-leveling the Extruder Is Too Far Away from the Bed when Printing the First Layer.
- 3. When Preheating the Extruder It Doesn't Heat up or the Temperature Displays as a Negative Value.
- 4. Insensitive Touchscreen: No Response When Clicking Menu Options.
- 5. Bed Not Heating During Preheating.
- 6. Magnetic Bed Sticker Unstuck and Warped.
- 7. Printer Stops / Extruder stops Mid-print/ Screen Unresponsive.
- 8. Sizzling Noise During Bed Preheating.
- 9. Both the Nozzle Temperature and Bed Temperature Displays as 0.
1. Bed Hitting the Extruder During Auto-leveling.
Cause: Filament residues at the nozzle tip or uncleared print bed.
Solution:
Step 1: Clean the nozzle and bed by removing the residues.
Step 2: Restart the printer and perform auto-leveling again.
Step 3: If the above steps don't work, consider checking for firmware updates. Upgrade the firmware if a new version is available and retry.
Step 4: If the above steps still don't solve the problem, please copy logs to a USB flash drive and contact customer support.
2. After Auto-leveling the Extruder Is Too Far Away from the Bed when Printing the First Layer.
Cause: Filament residues at the nozzle tip or uncleared print bed.
Solution:
Step 1: Clean the nozzle and bed by removing the residues.
Step 2: Restart the printer and perform automatic leveling again.
Step 3: If the above steps don't work, consider checking for firmware updates. Upgrade the firmware if a new version is available and retry .
Step 4: If the above steps still don't solve the problem, please copy logs to a USB flash drive and contact customer support.
3. When Preheating the Extruder It Doesn't Heat up or the Temperature Displays as a Negative Value.
Cause: Firmware communication failure; Nozzle damaged or extruder cable in poor contact.
Solution:
Step 1: After powering on, check if the nozzle temperature display on the screen is normal. If it shows a negative or 0 value, restart the printer.
Step 2: If Step 1 doesn't work, turn off the printer again, remove and reinstall the nozzle, and then restart the printer.
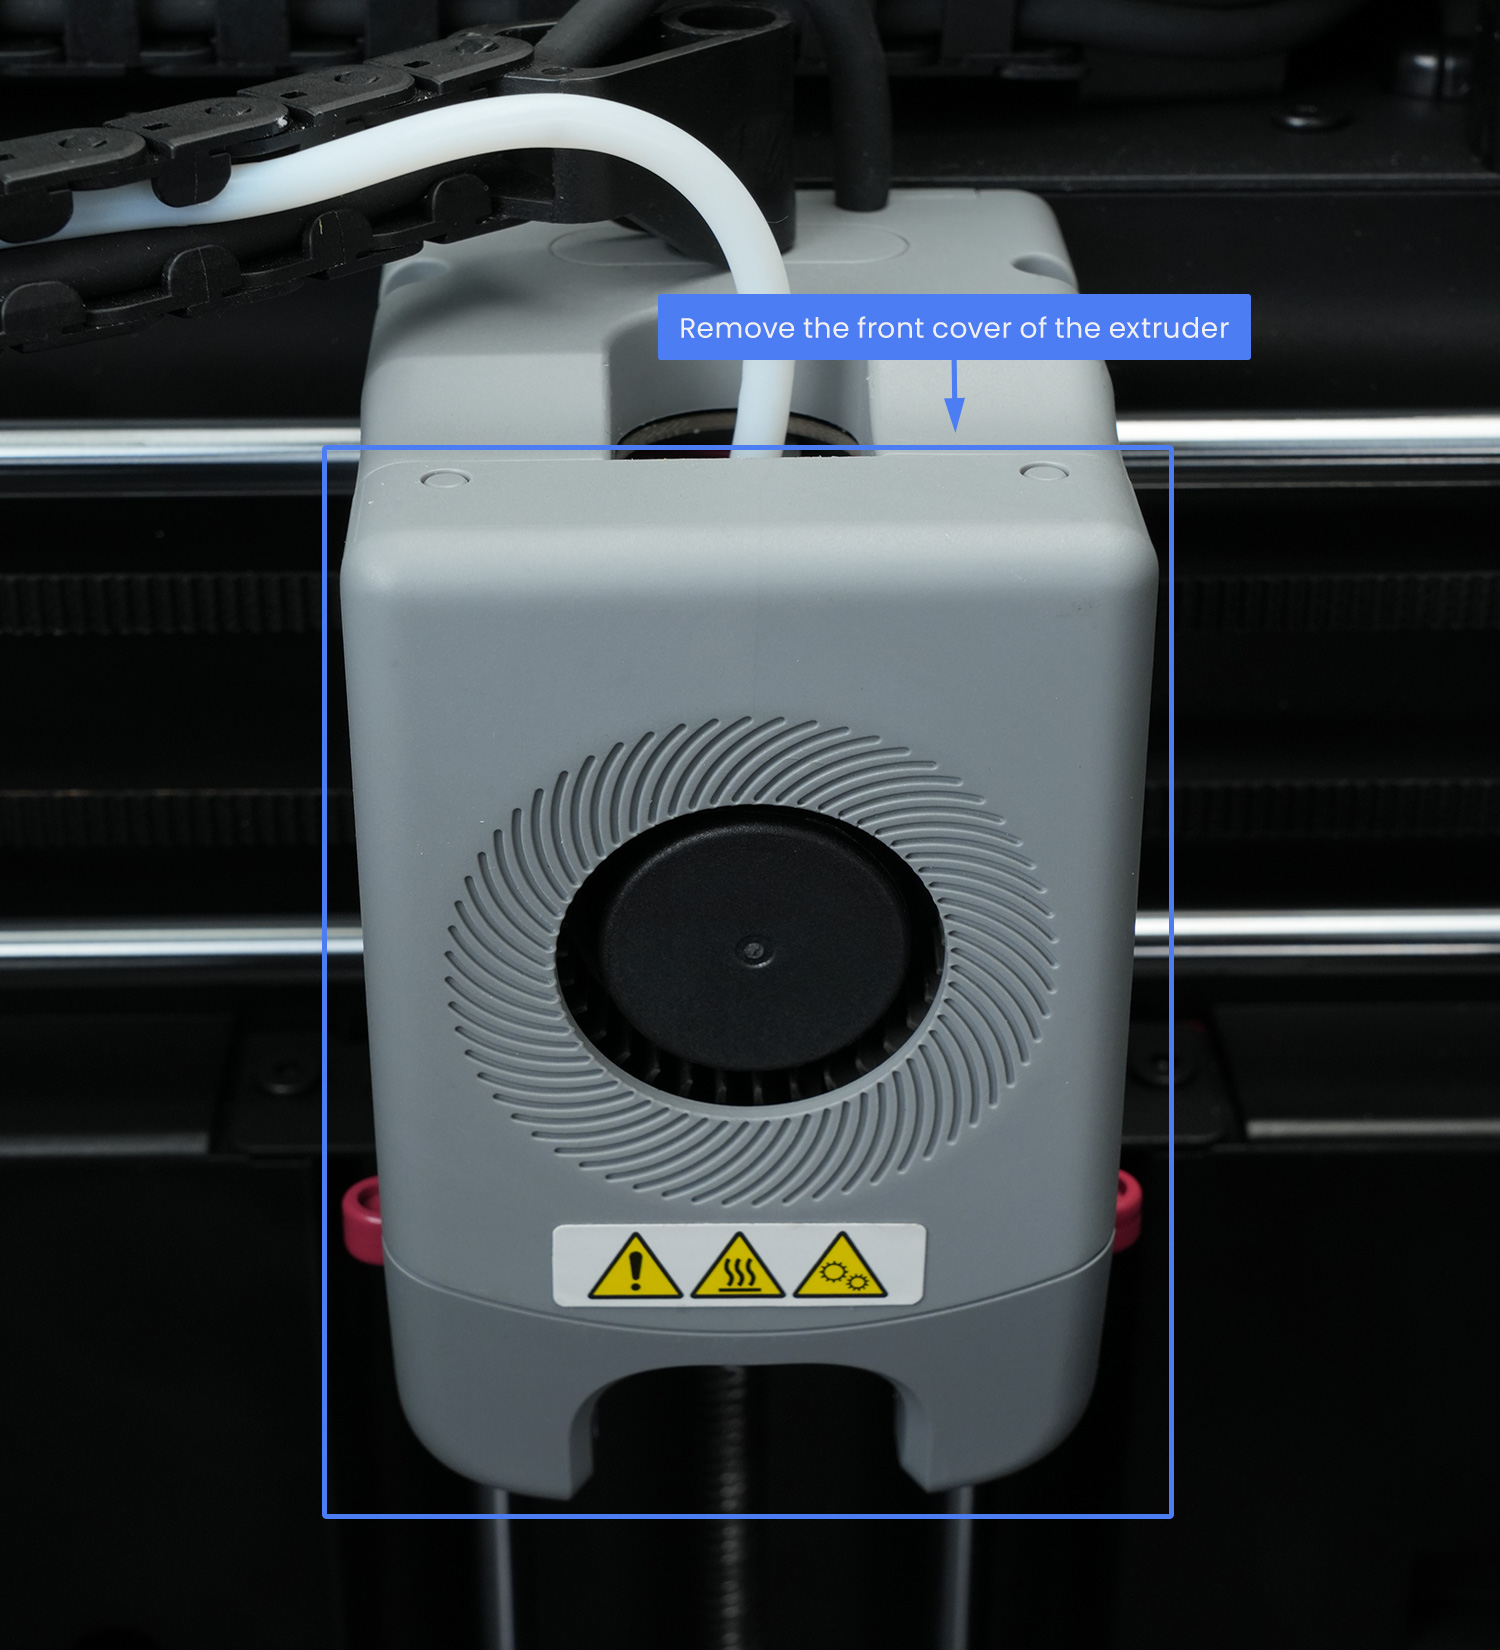
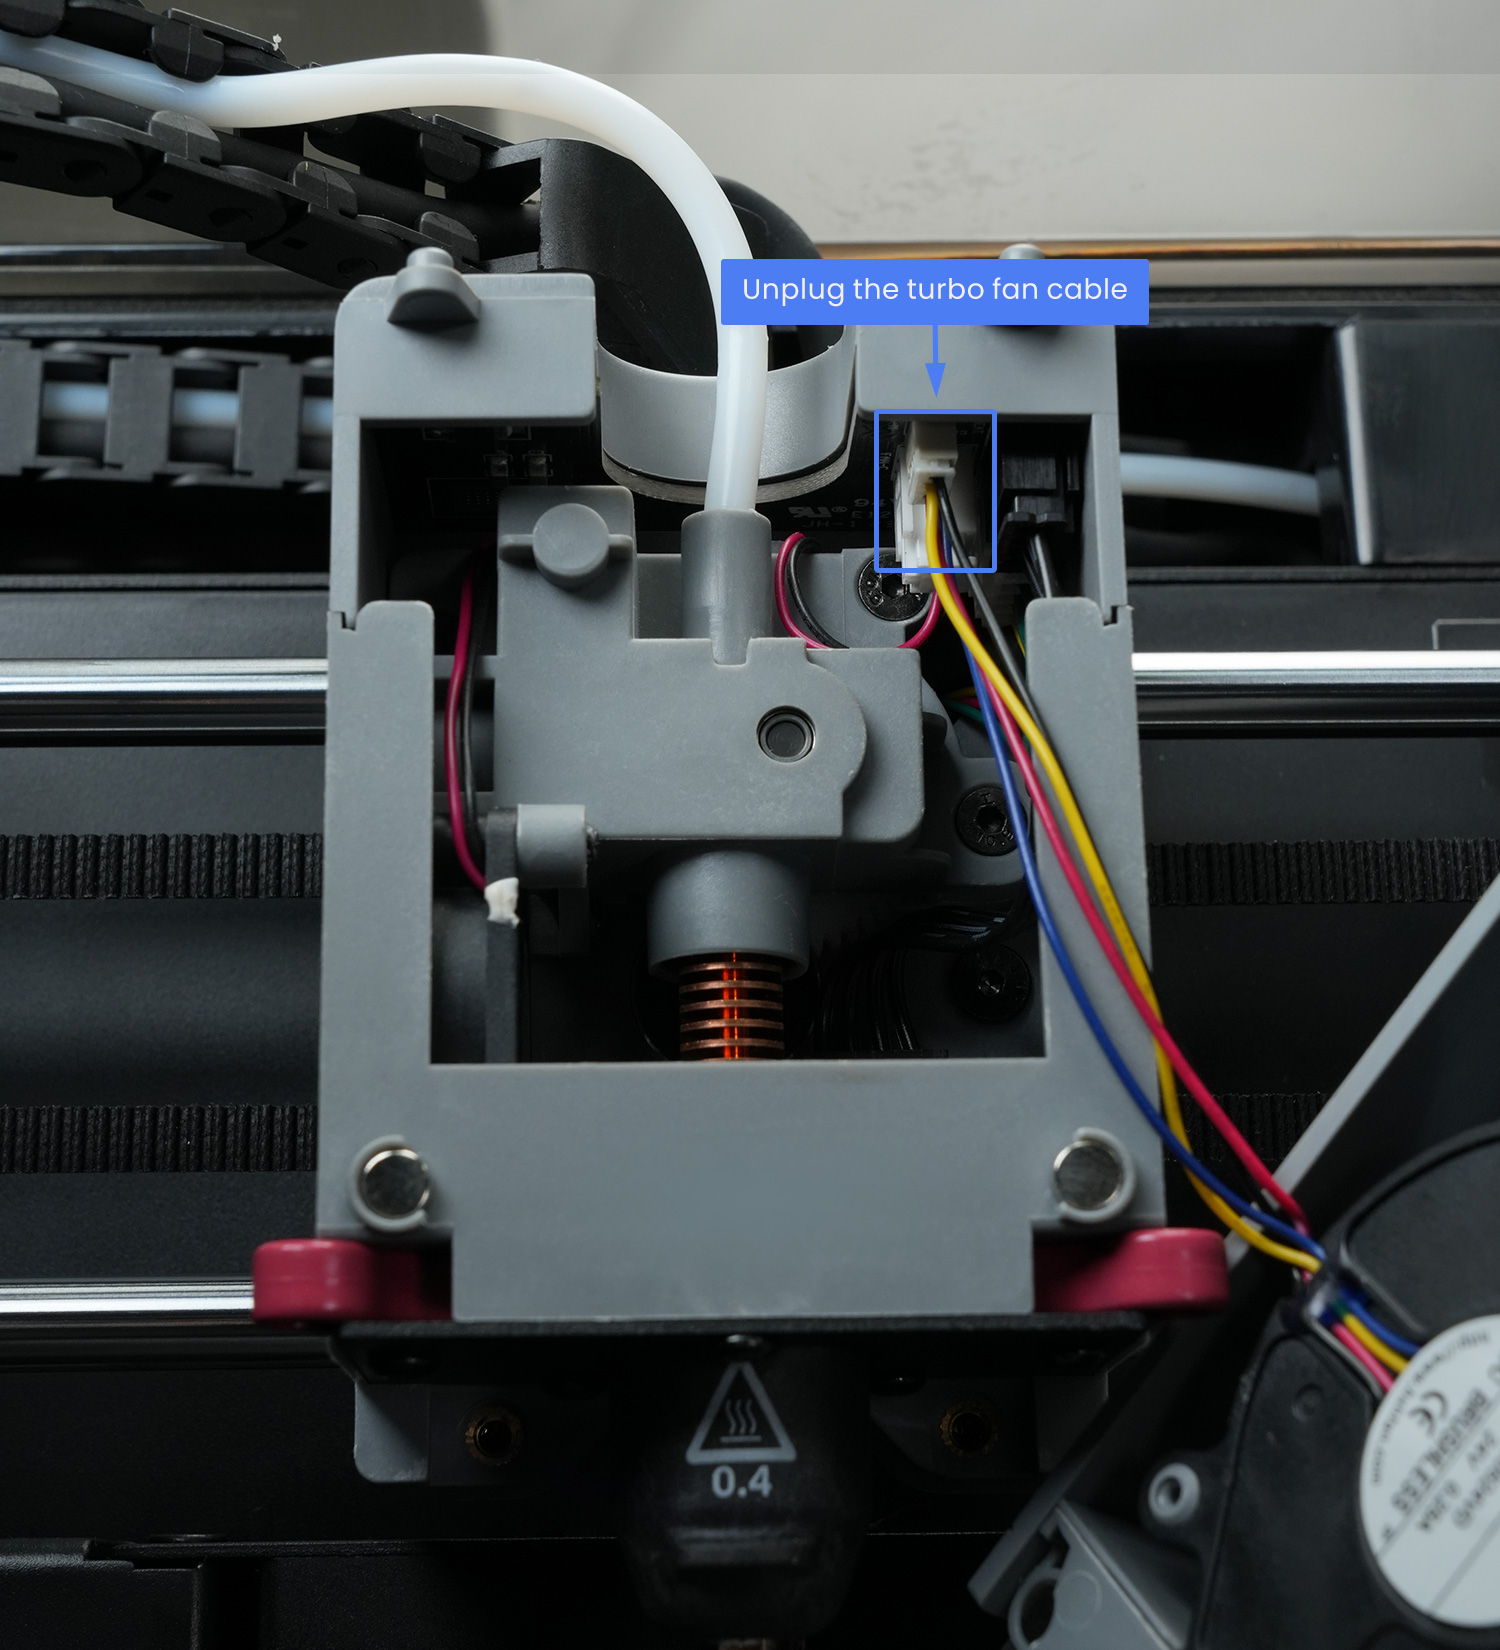
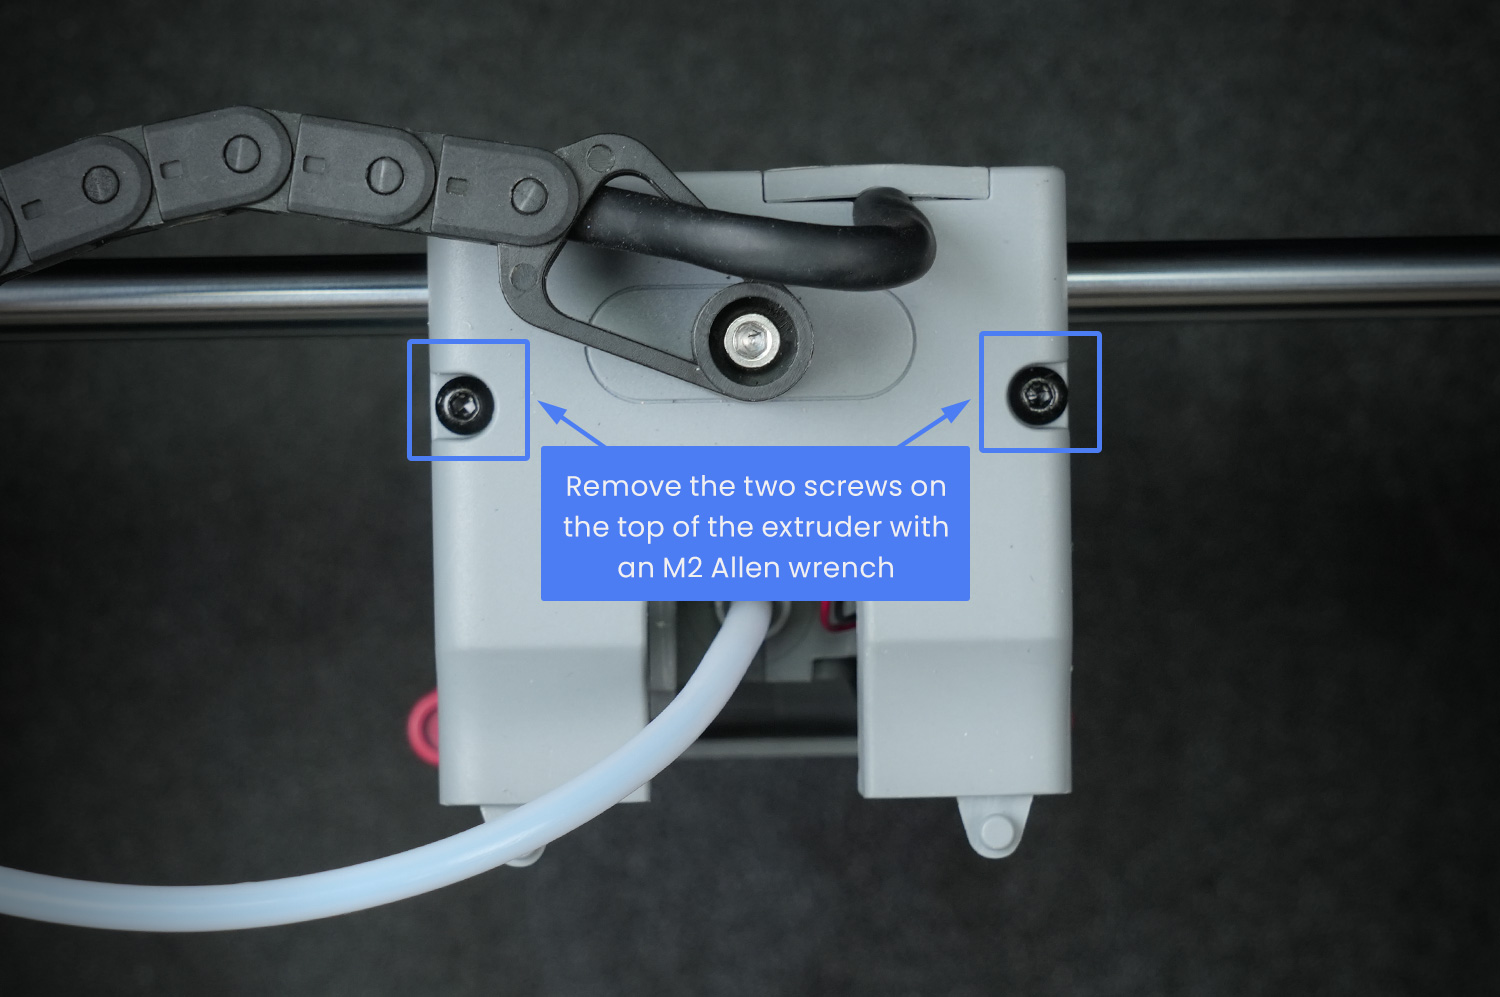
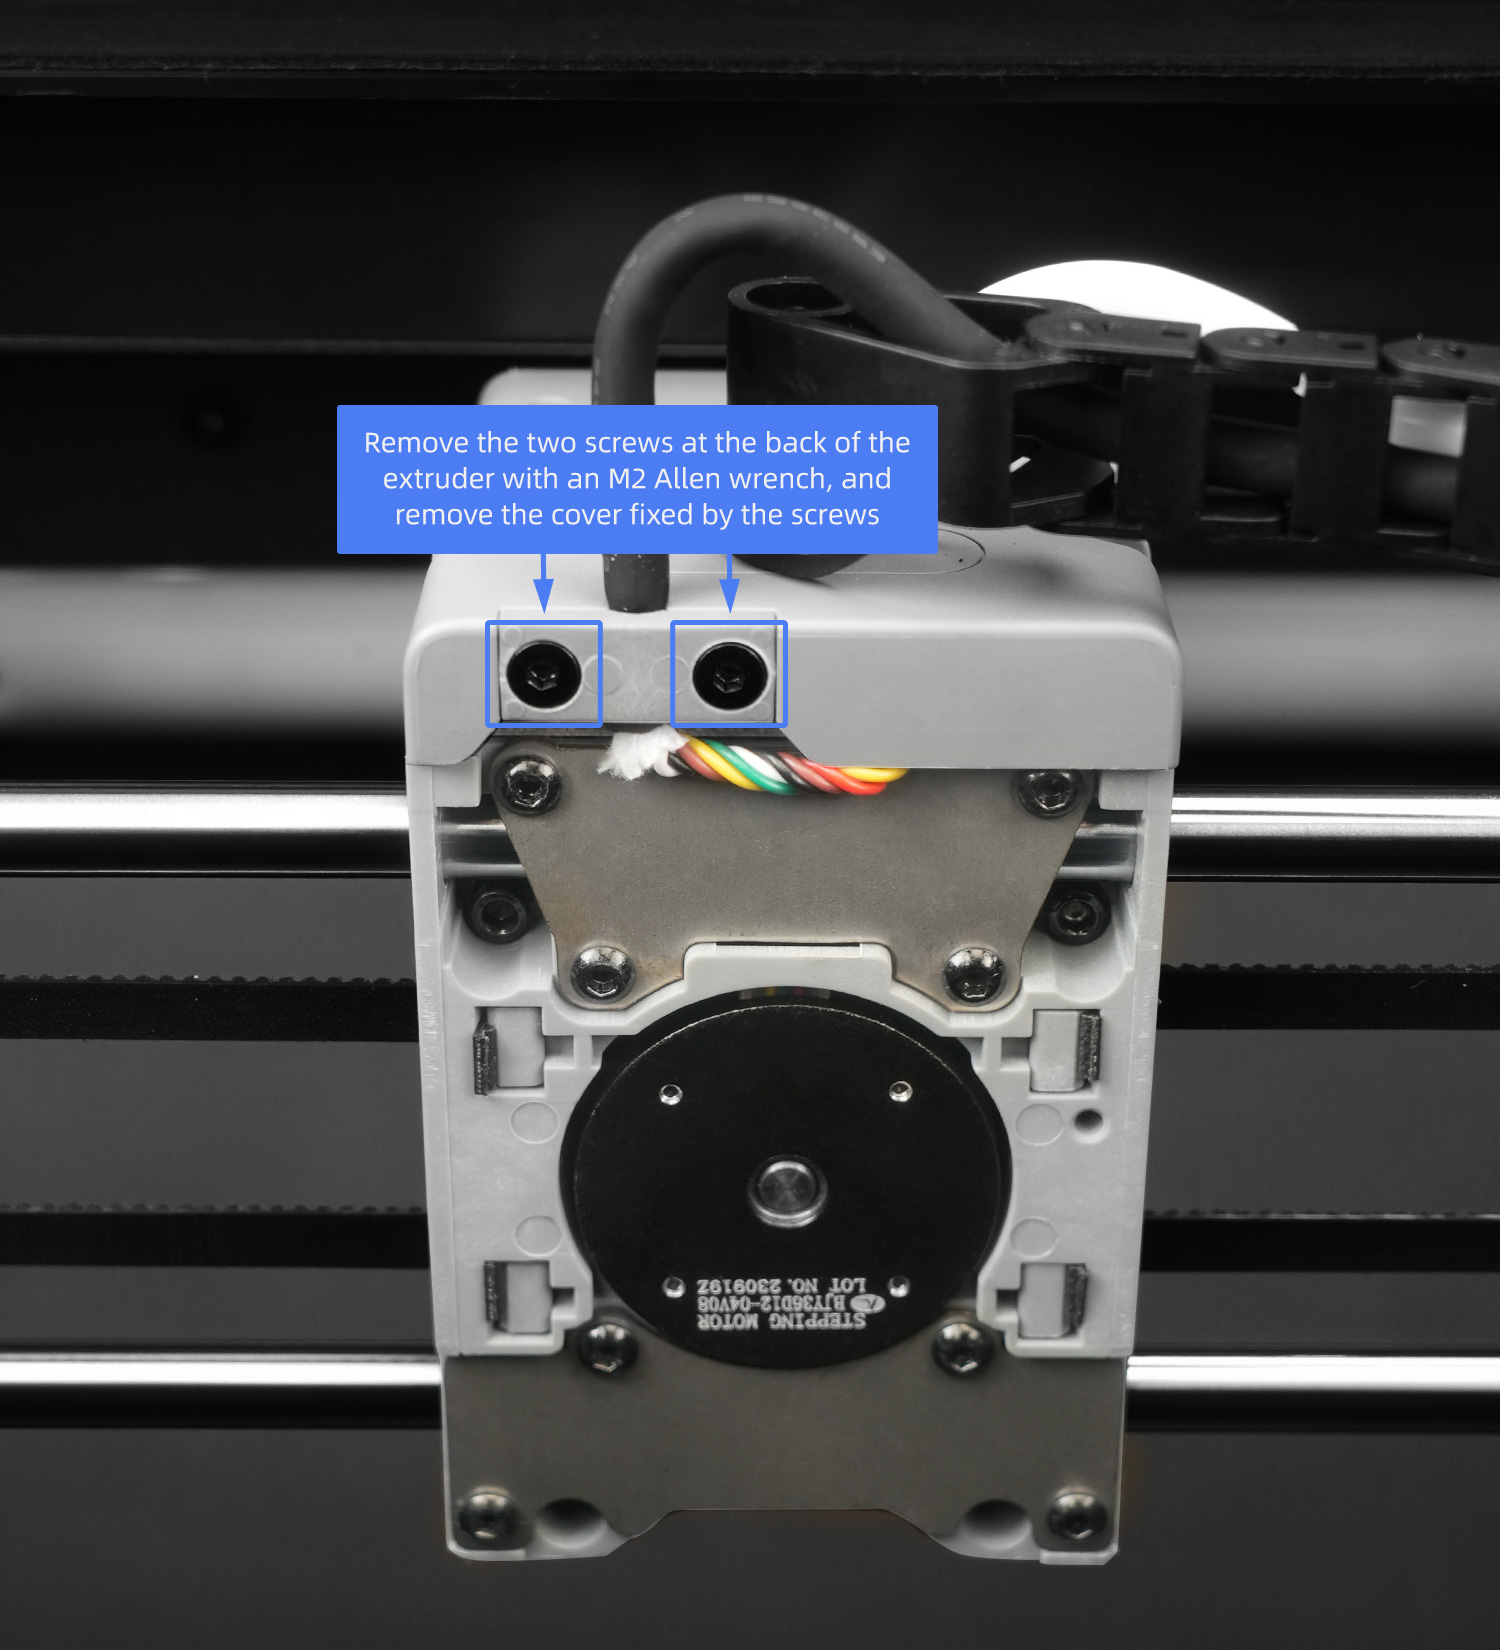
Step 3: If Step 2 doesn't work, turn off the printer, open the top and rear covers of the extruder, and check for poor contact or damage to the extruder connection cable. If there's poor contact, unplug and replug the extruder connection cable, and restart the printer.
Specific steps for checking the extruder connection cable are as follows:
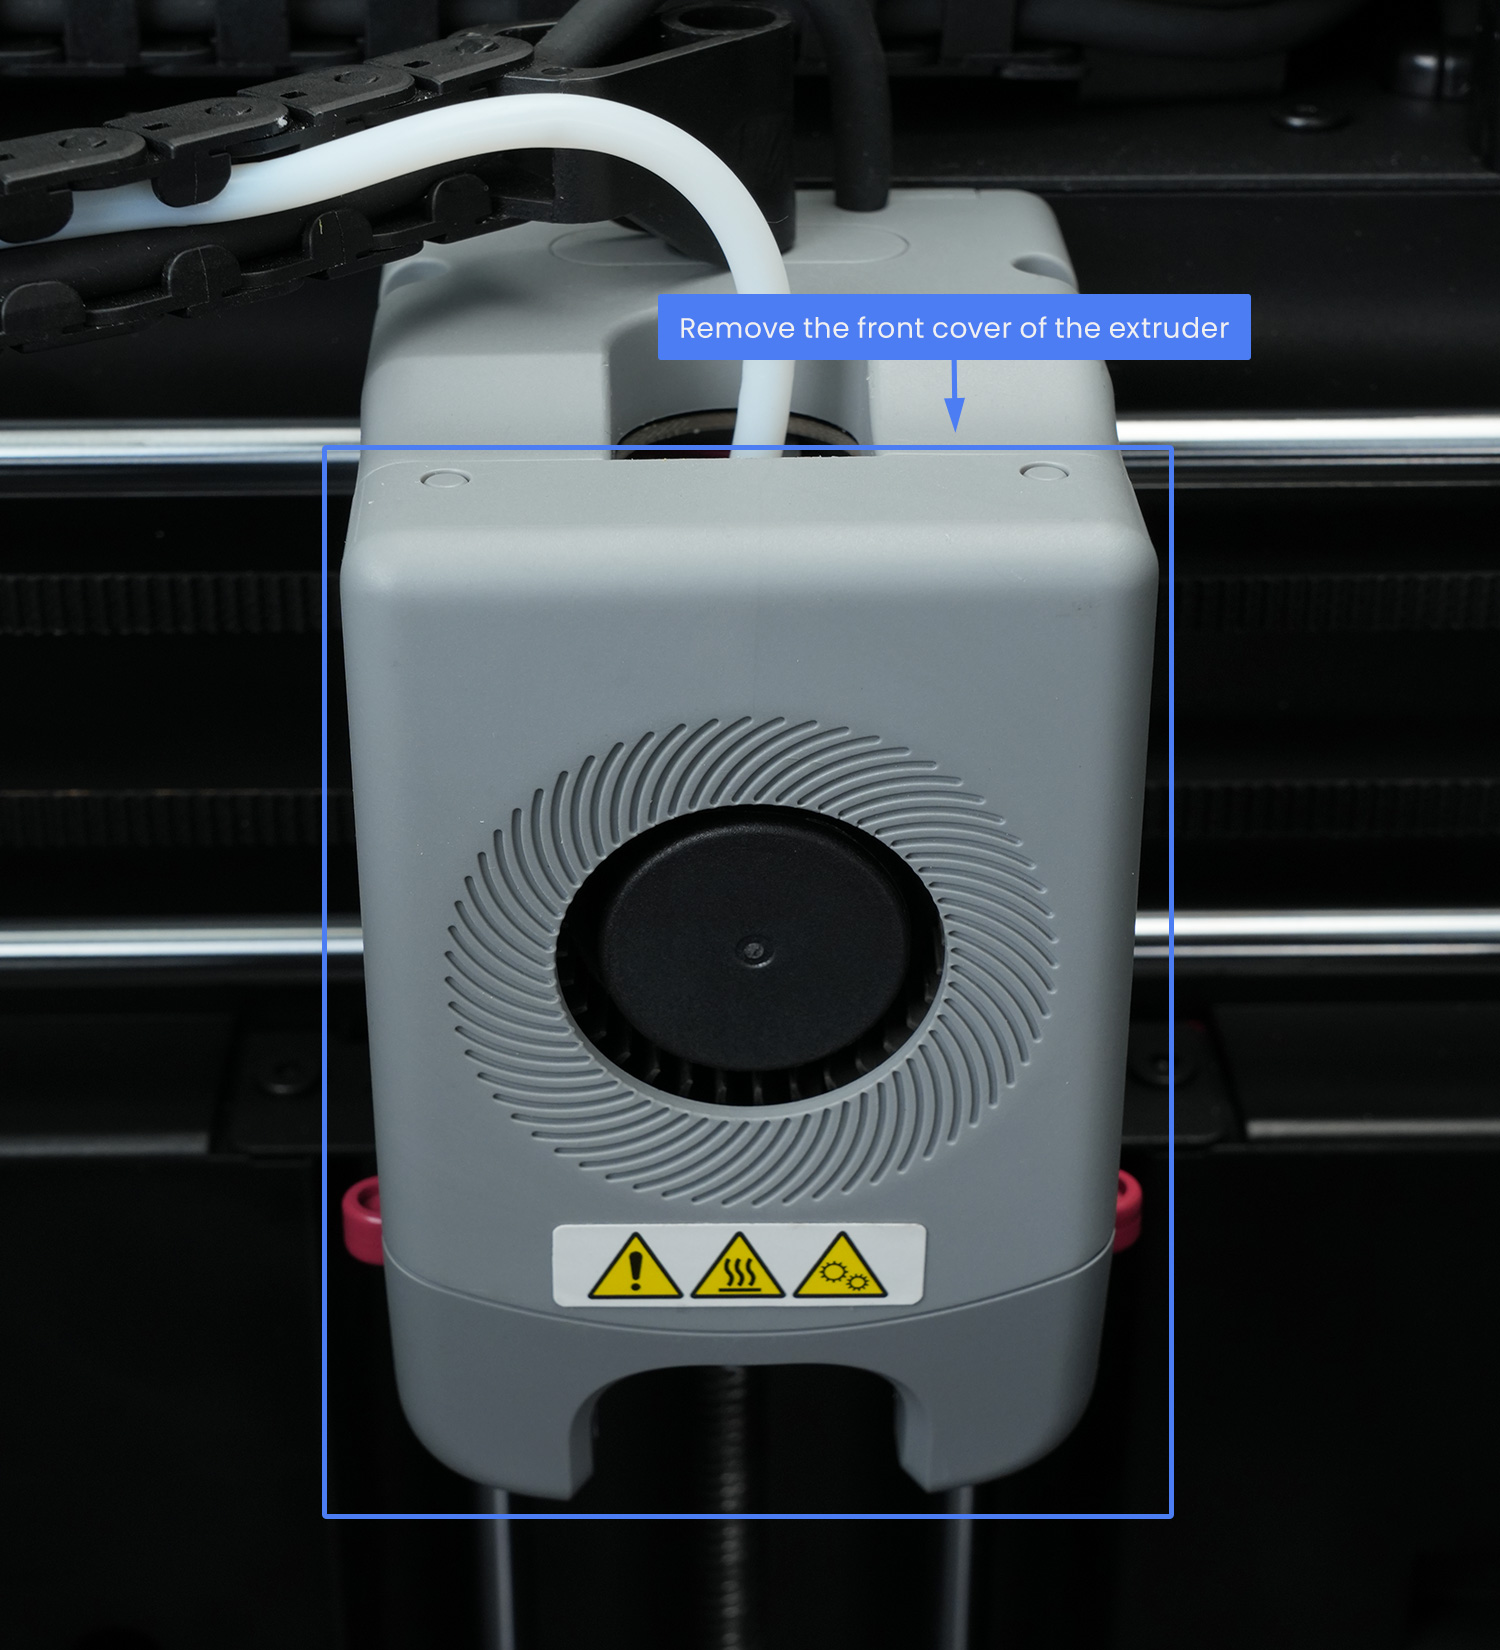
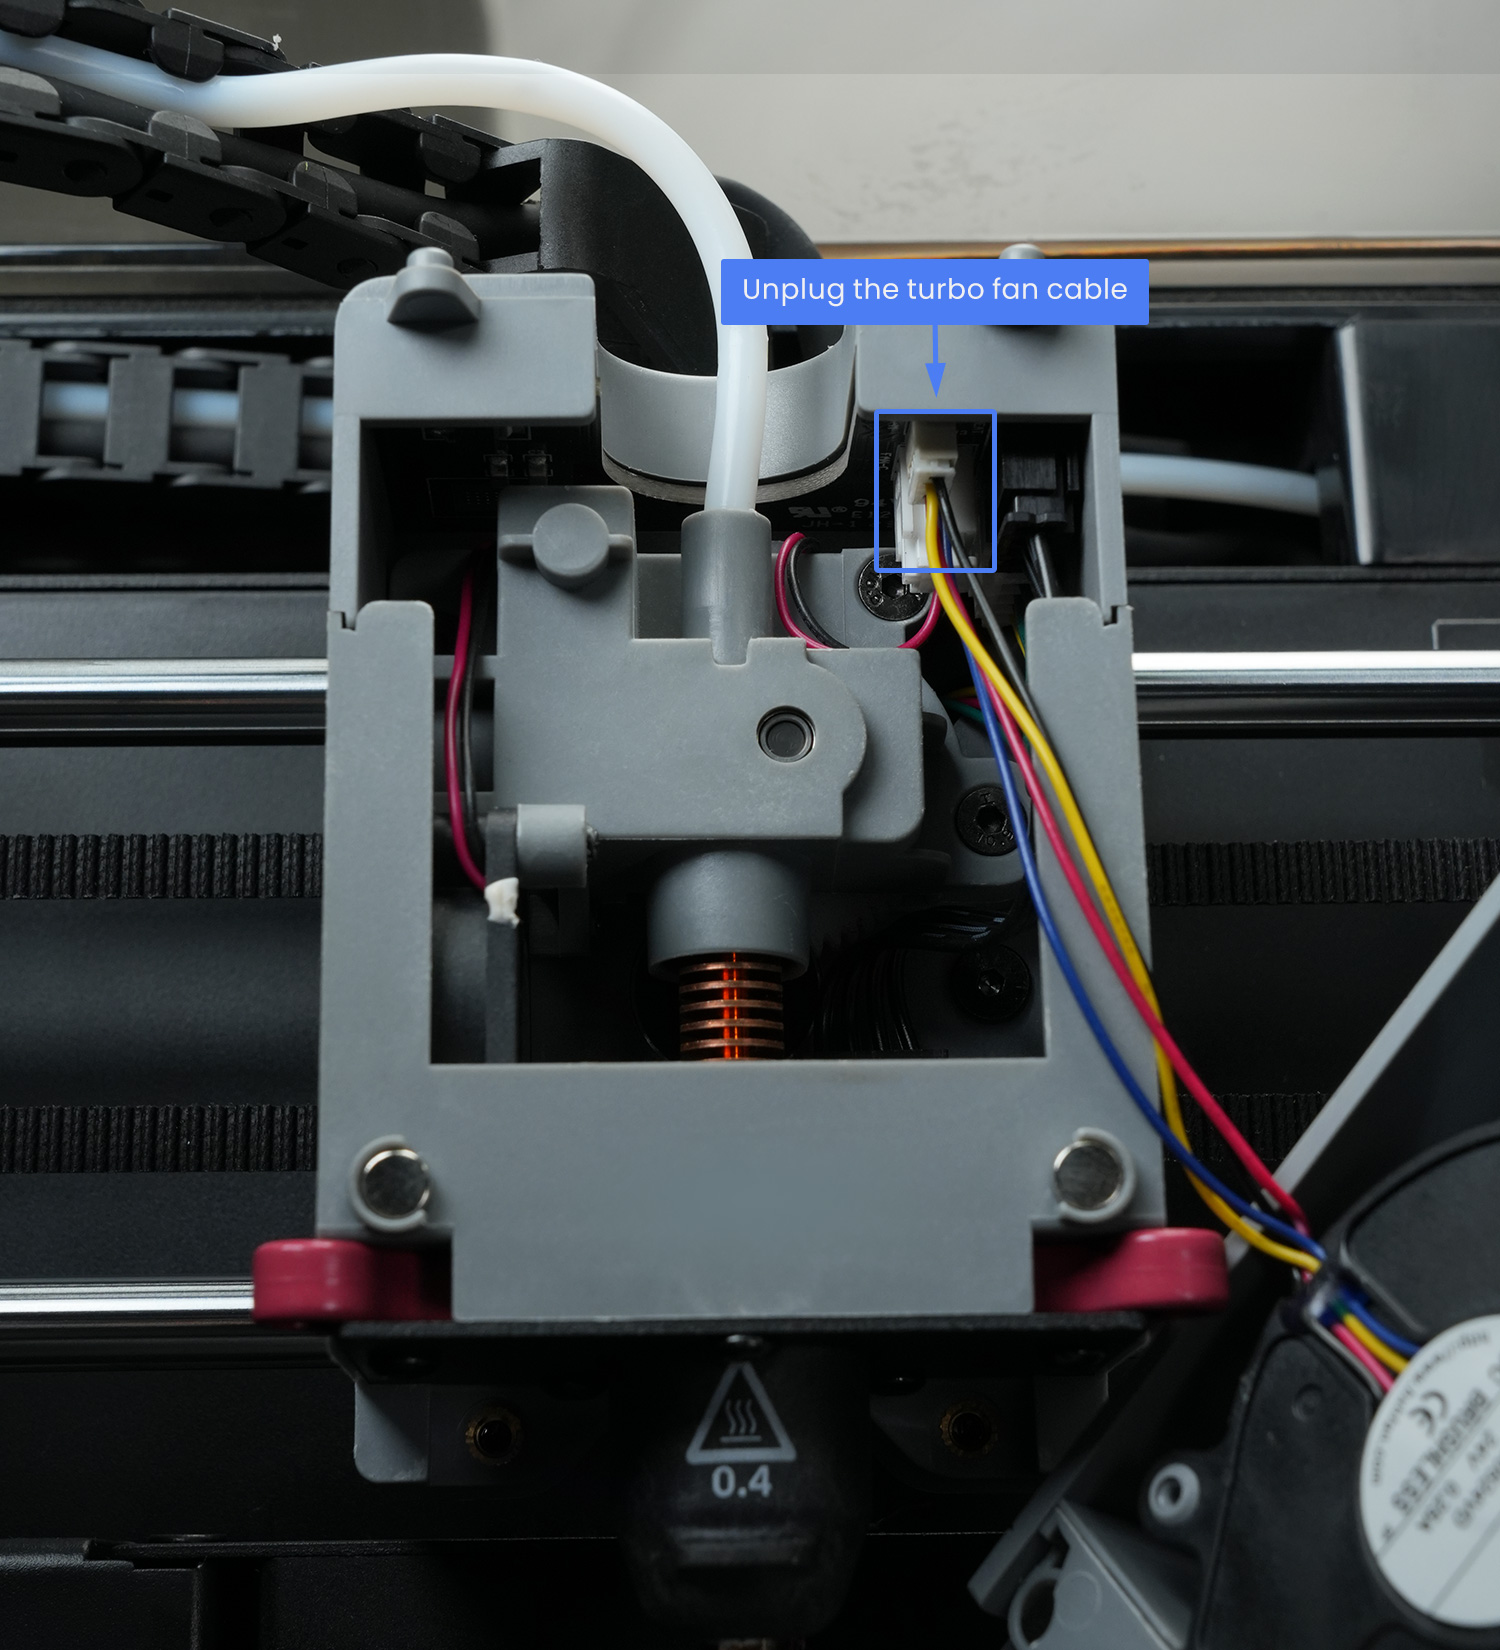
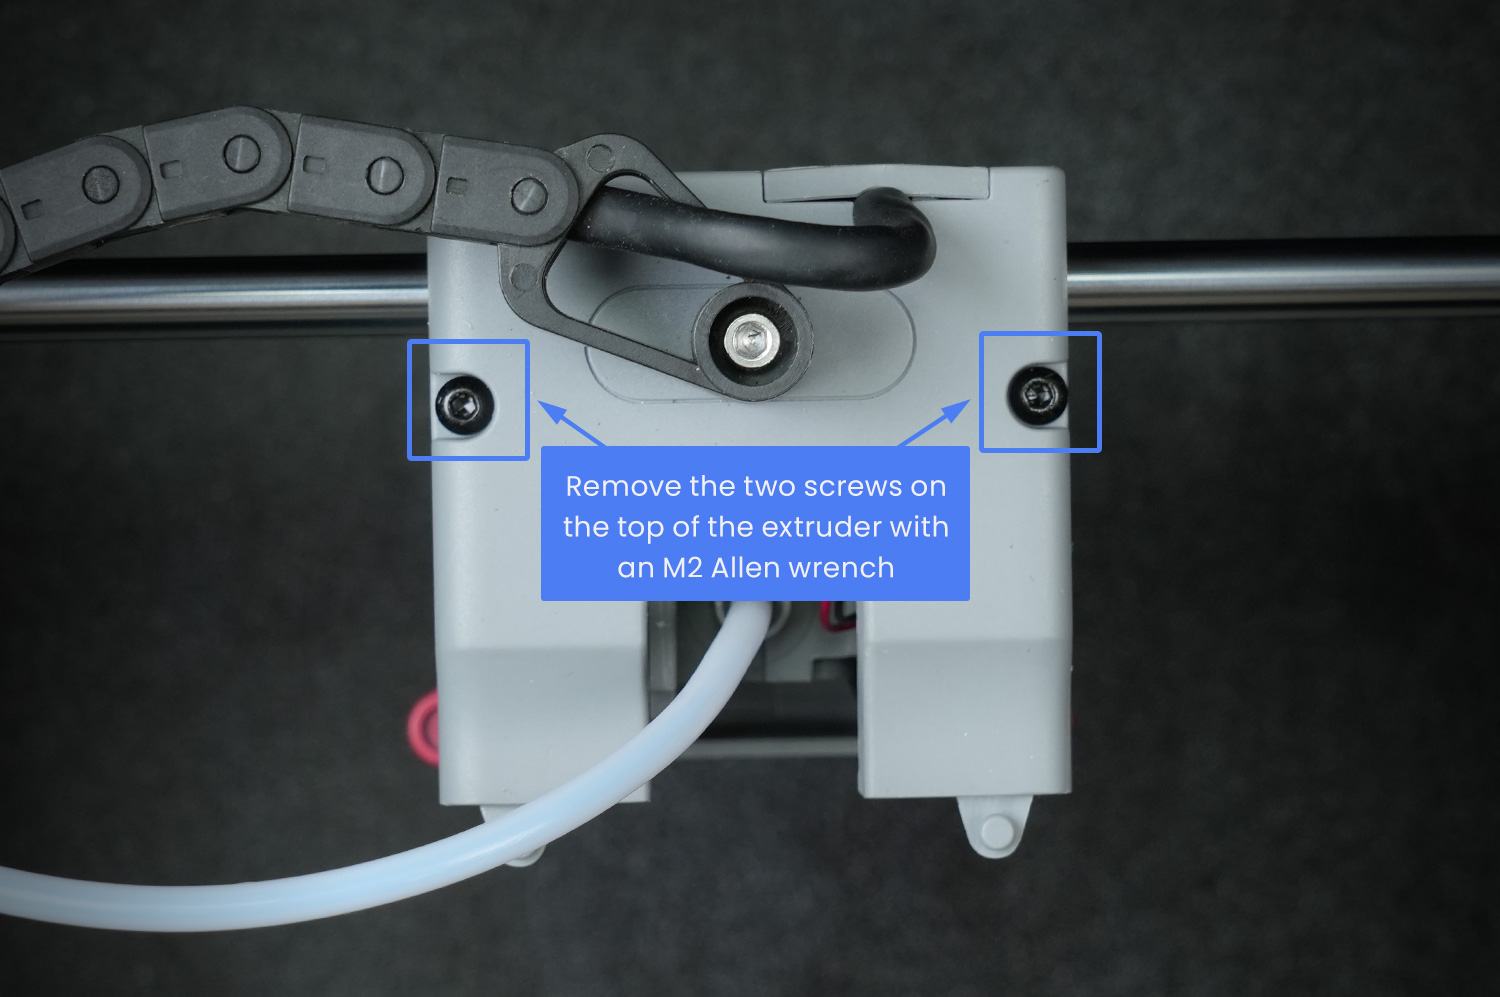
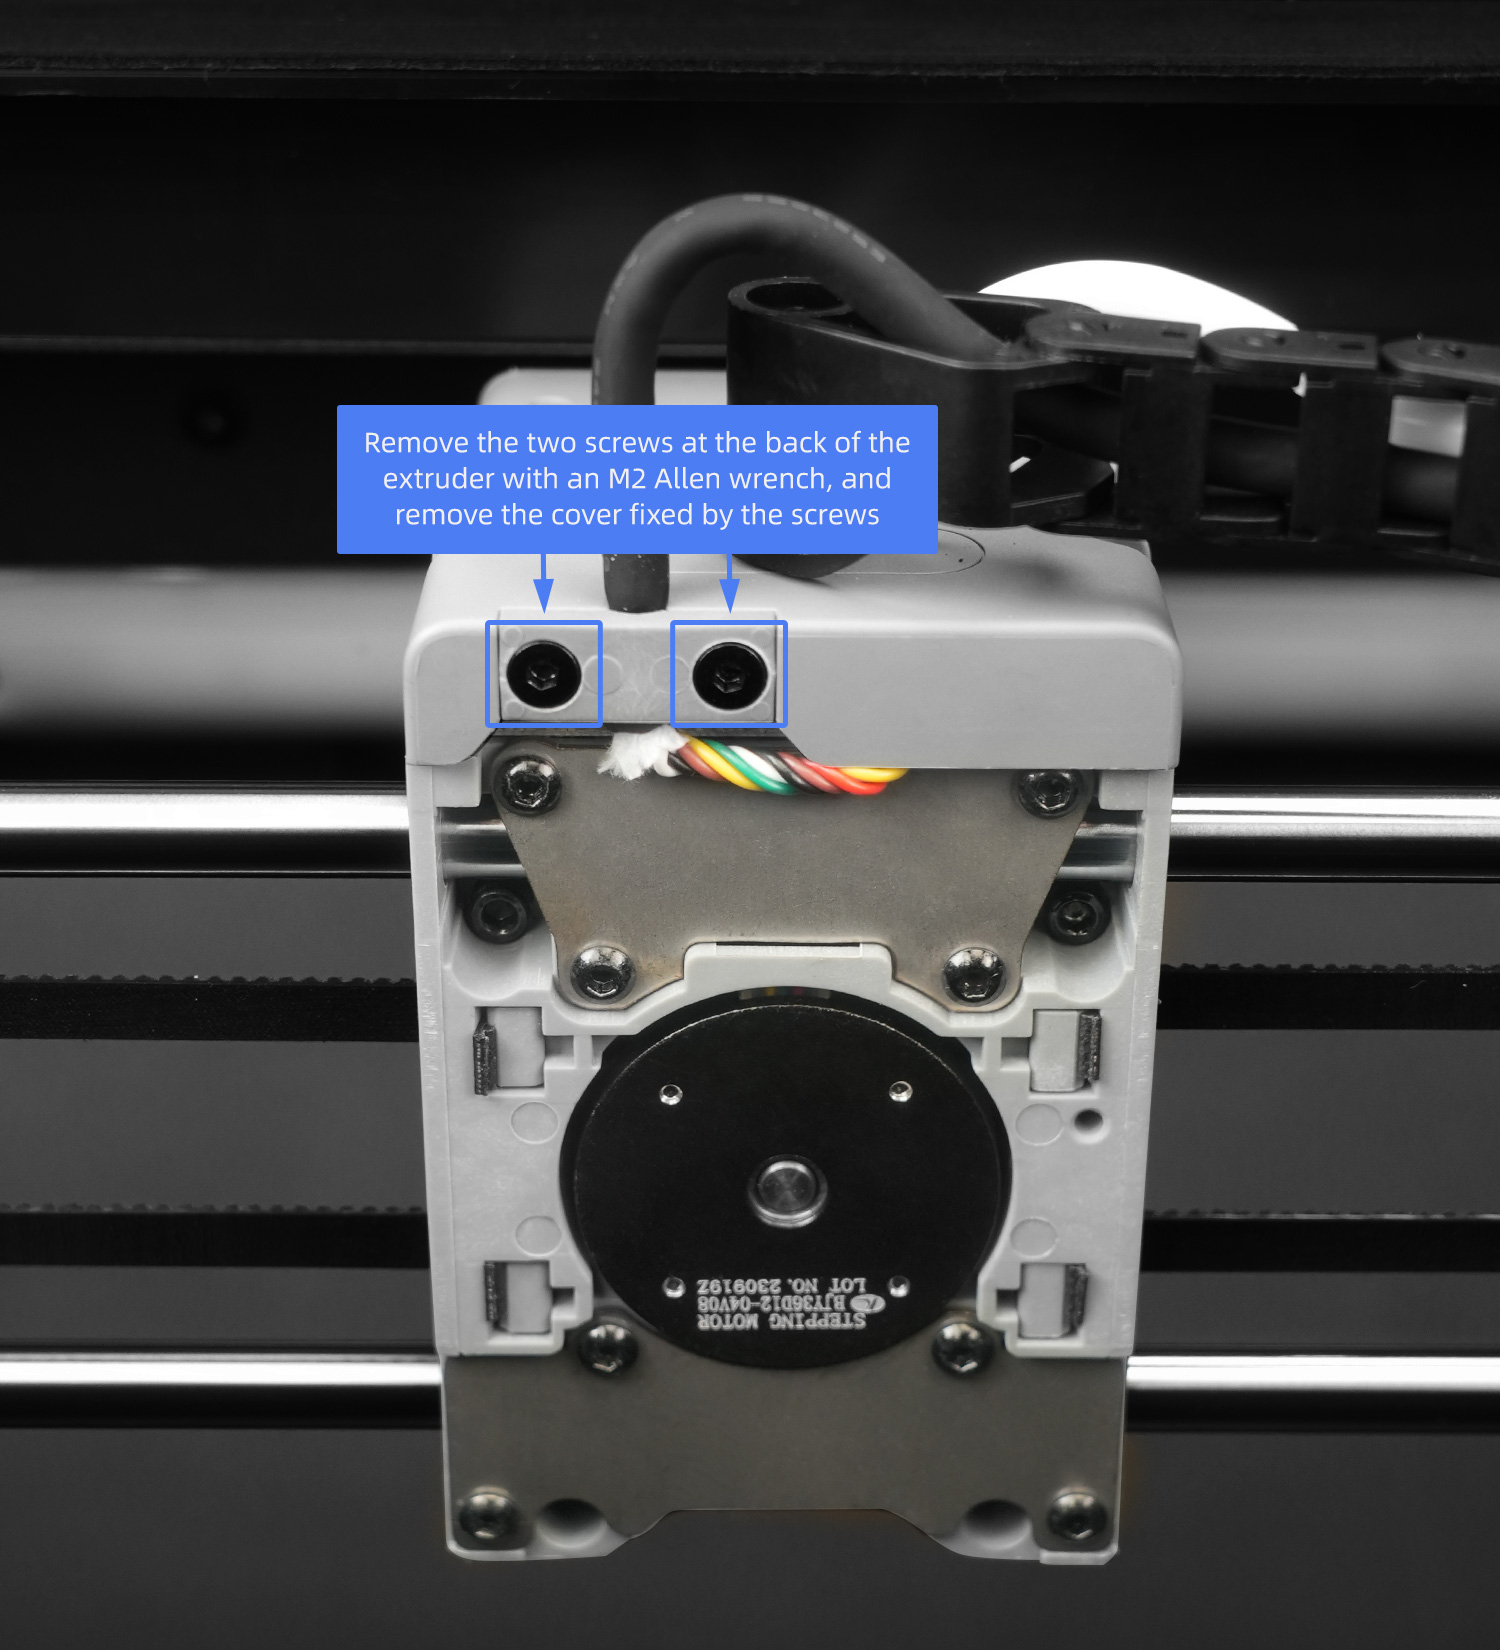
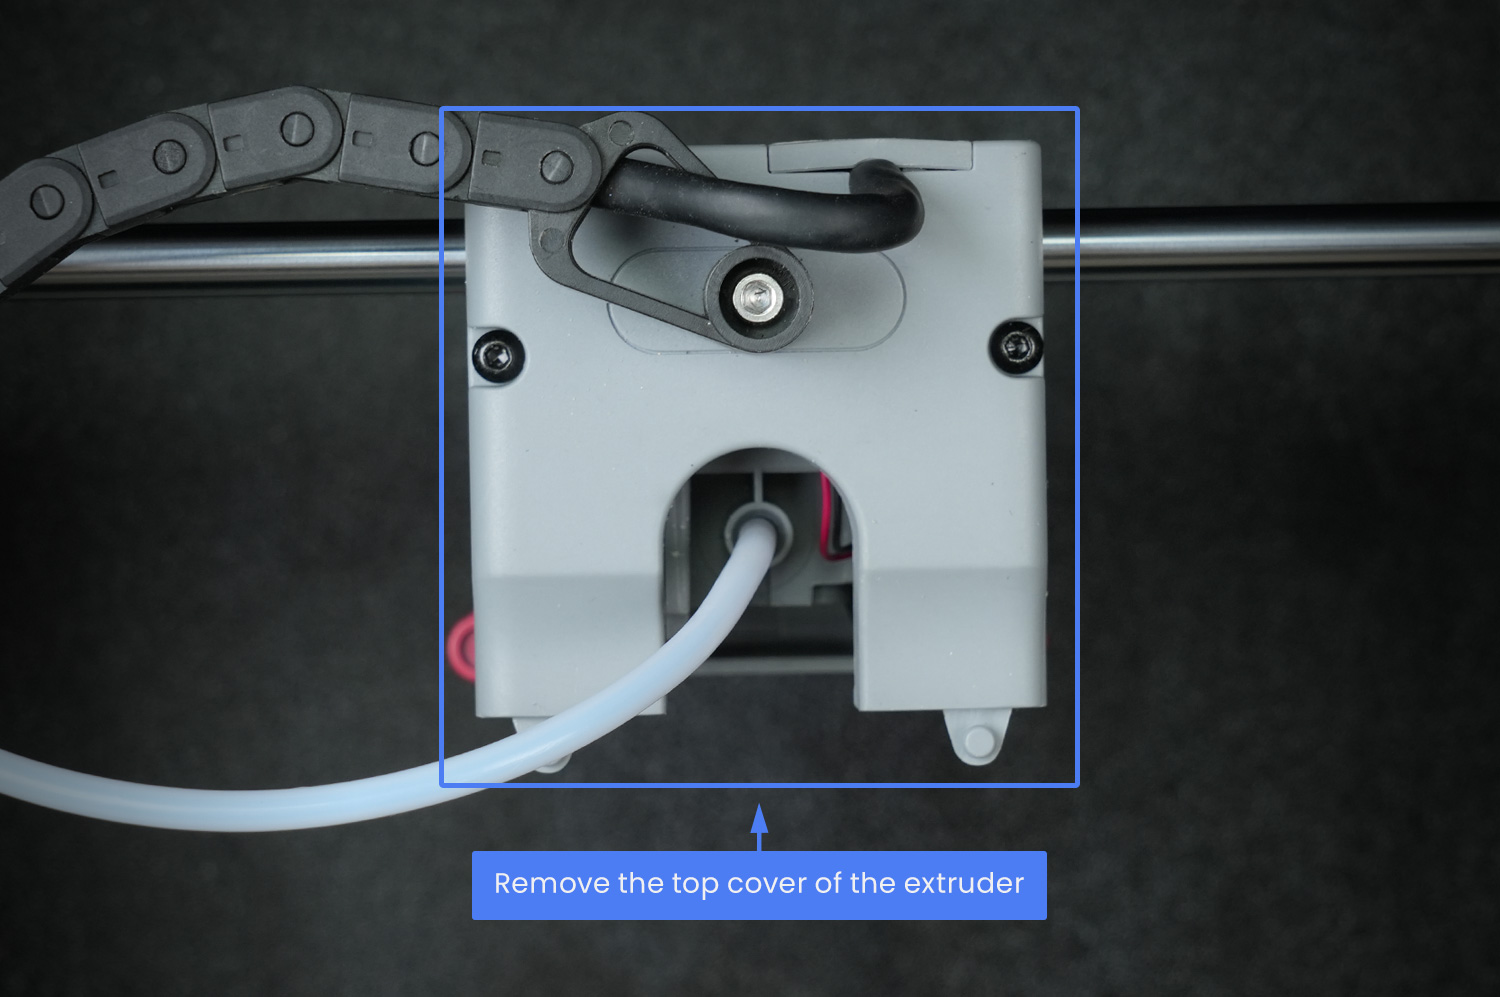
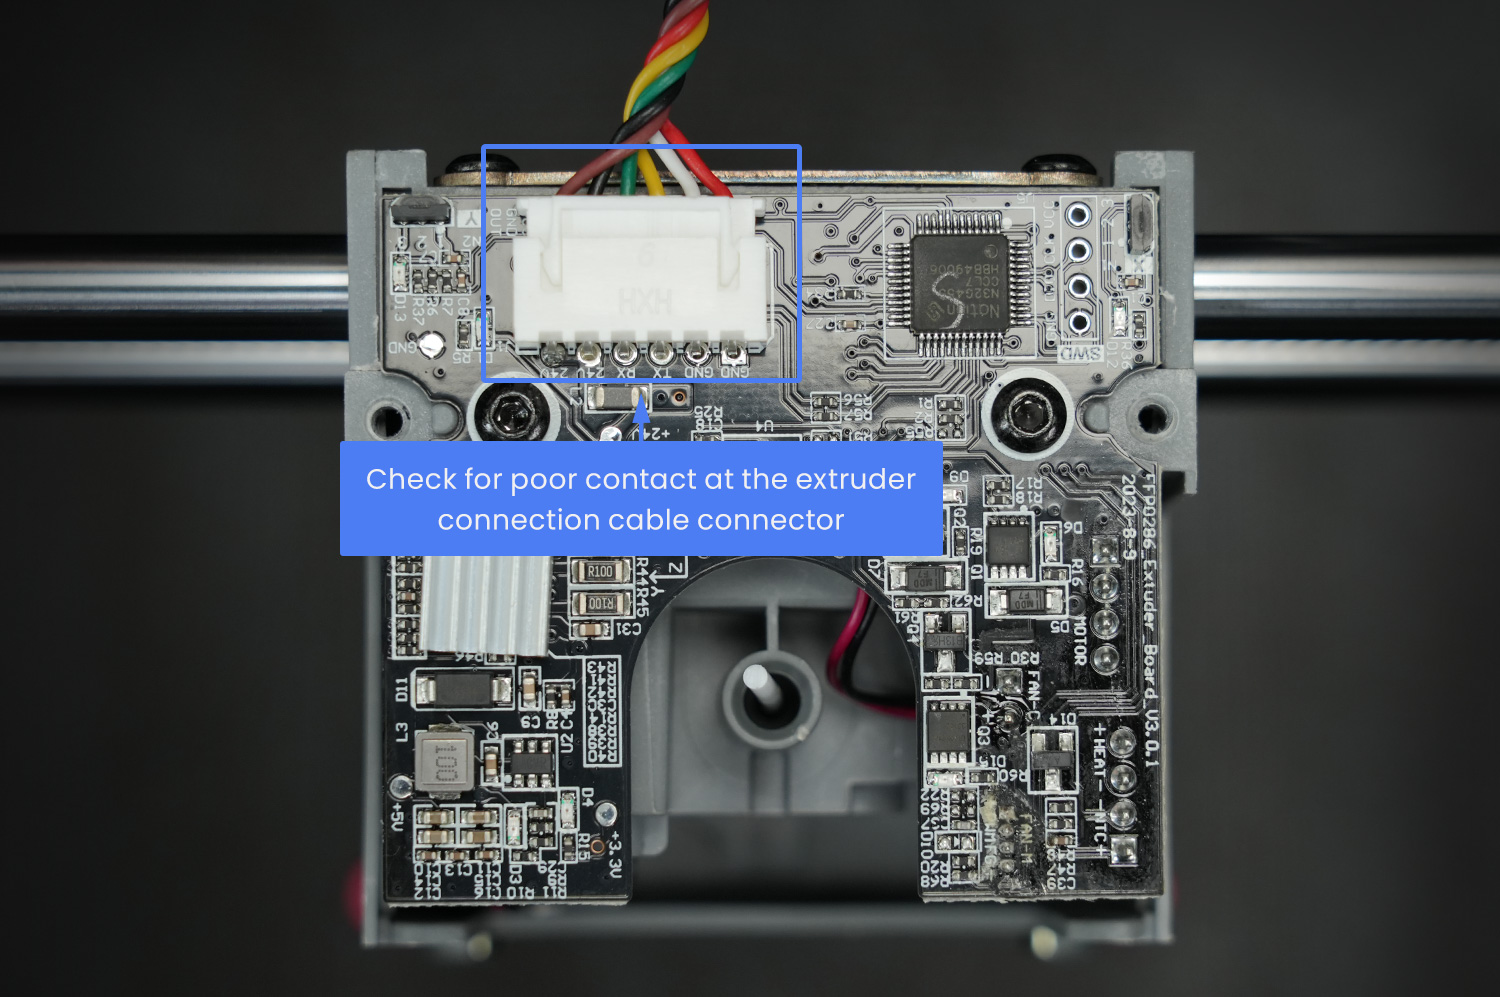
Step 4: If the above steps don't work, replace the nozzle.
Step 5: If the above steps still don't solve the problem, please copy logs to a USB flash drive and contact customer support.
4. Insensitive Touchscreen: No Response When Clicking Menu Options.
Cause: Firmware communication failure.
Solution:
Step 1: Restart the printer.
Step 2: If Step 1 doesn't work, please copy logs to a USB flash drive and contact customer support.
5. Bed Not Heating During Preheating.
Cause: Poor cable connection or faulty bed heating assembly.
Solution 1: Restart the printer and check if it heats up normally.
Solution 2: Unplug and replug the cables.
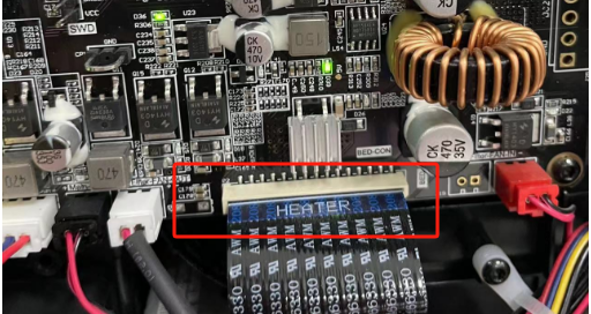
Step 1: Manually raise the bed to the maximum Z-axis height, unplug and replug the cable and other connection cables, and then confirm if the print bed functions normally. Below are steps for replugging.
Step 1: Remove the cable cover.
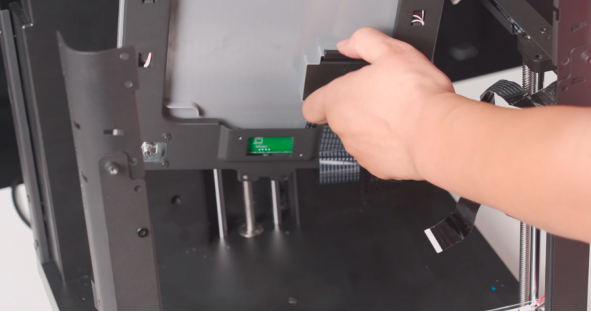
Step 2: Unplug and replug the cable
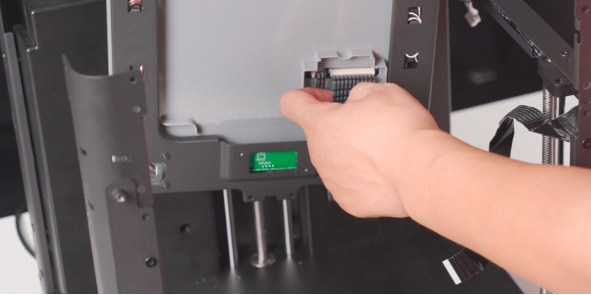
Step 3: Unplug and replug the motherboard cable (remove all screws on the back panel of the printer).
6. Magnetic Bed Sticker Unstuck and Warped.
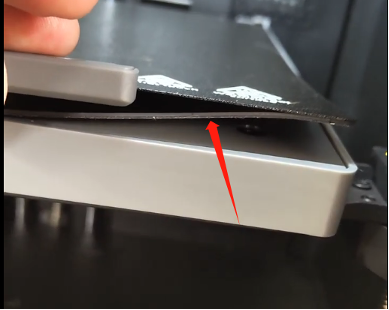
Cause: Sticker adhesive failure
Usage Tips: When printing high-temperature models, please remove it after the bed cools down.
Solution: Replace the aluminum substrate and magnetic sticker.View Replacement Guide [ad5mseries-replace-the-platform-heating-plate&heating-plate-cable](/en/adventurer-series/maintenance/ad5mseries-replace-the-platform-heating-plate&heating-plate-cable =650x).
7. Printer Stops / Extruder stops Mid-print/ Screen Unresponsive.
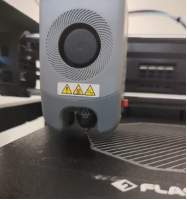
Cause: Abnormal firmware; this issue is optimized in the latest beta firmware.
Solution:
Step 1: Restart the printer and try again.
Step 2: If the issue persists, please update to the latest firmware.
Step 3: If the issue persists, please provide us with logs for assistance.
8. Sizzling Noise During Bed Preheating.
Cause: Part misalignment
Solution: Loosen the four bolts under the print bed and re-tighten. Please use the model below to print the disassembly tool.
leveling_nut_socket.stl
9. Both the Nozzle Temperature and Bed Temperature Displays as 0.
Cause: Extruder connection cable in poor contact or extruder board damaged, resulting in communication interruption between the motherboard and the extruder.
Solution:
Step 1: Restart the printer and observe if the same issue persists. If so, please proceed to Step 2.
Step 2: After shutting down the printer, follow the pictures below to open the rear cover of the extruder and check for poor contact or damage to the extruder connection cable. Try unplugging and replugging the extruder connection cable before restarting the printer.
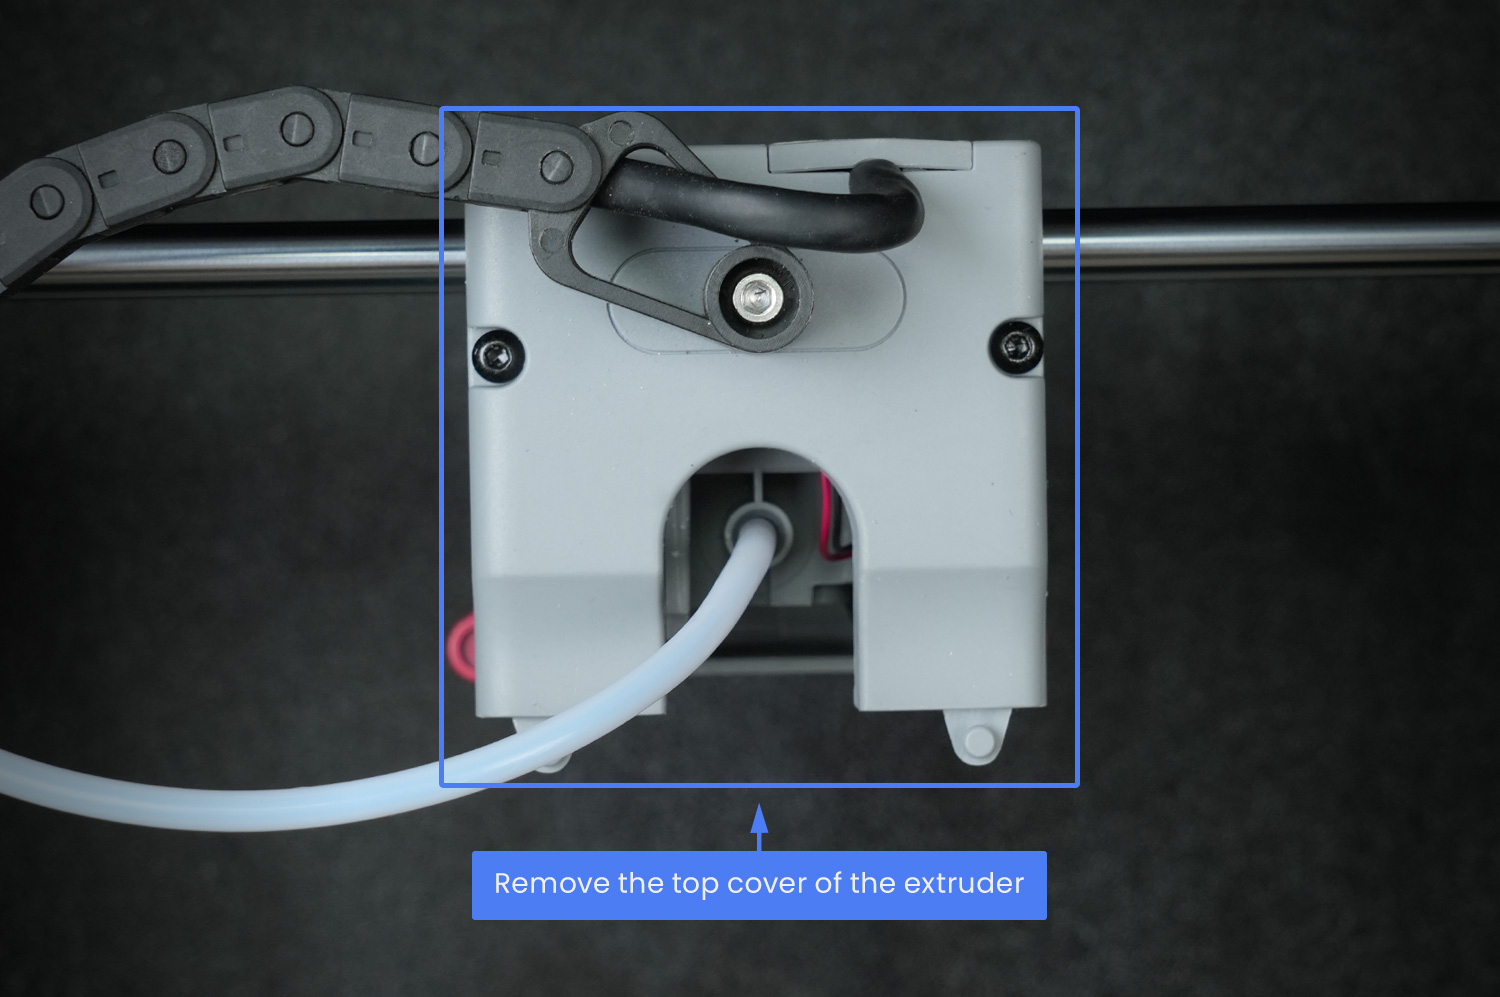
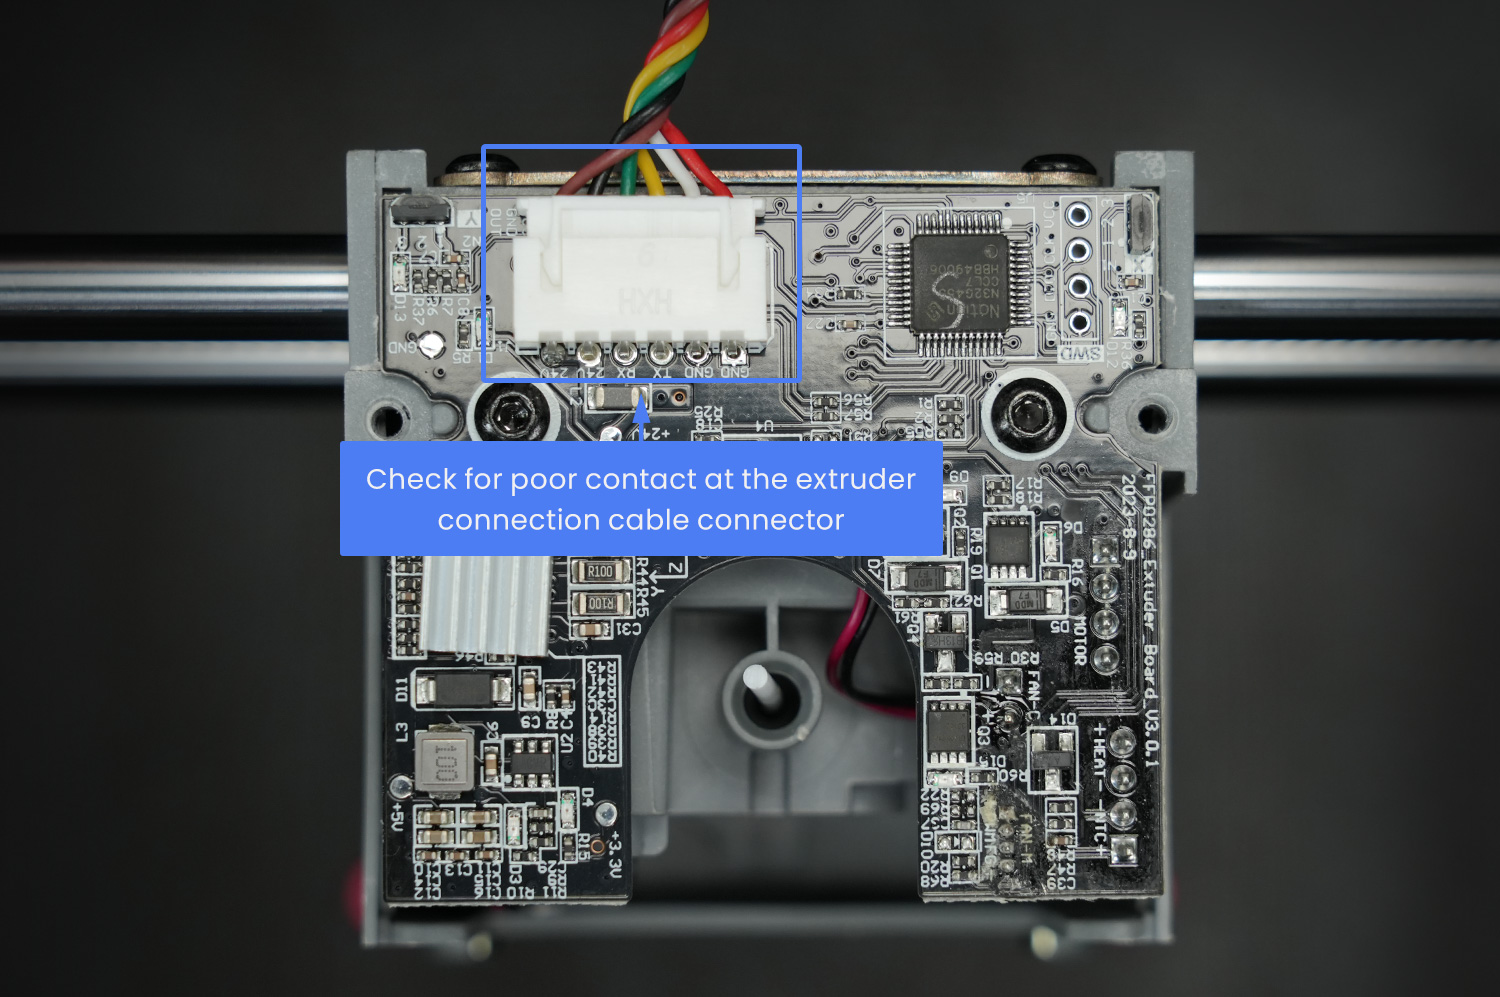
Step 3: If Step 2 does not work, please contact customer support to replace the extruder connection cable/extruder board/motherboard. (Please refer to the Replace the extruder cable video for replacement instructions:ad5mpro-replace-the-extuder-bus.)
Updated on 03 Sep 2024
What are your Feelings?
Thanks for your feedback
Newsletter
Promotions, new products and sales. Directly to your inbox.

Free shipping
Available to the U.S., Canada, European Union, and Australia.

12-years Brand
Trusted by over 1 million users worldwide.

Secure payment
Multiple safe payment options for worry-free shopping.

Points & Rewards
Save big with points on every purchase.


